DIY Truck Bed Rack

For those not interested in the details, here’s the video:

For years we used a Subaru Forester as a utility and travel vehicle. We could throw kayaks on top and bikes on the back, or haul a boat or utility trailer. Apparently, adding in coolers and camping gear, and us, far exceeded the load capacity it was designed for. This spring we broke both rear springs and struts. I got a finger wagging from my mechanic.

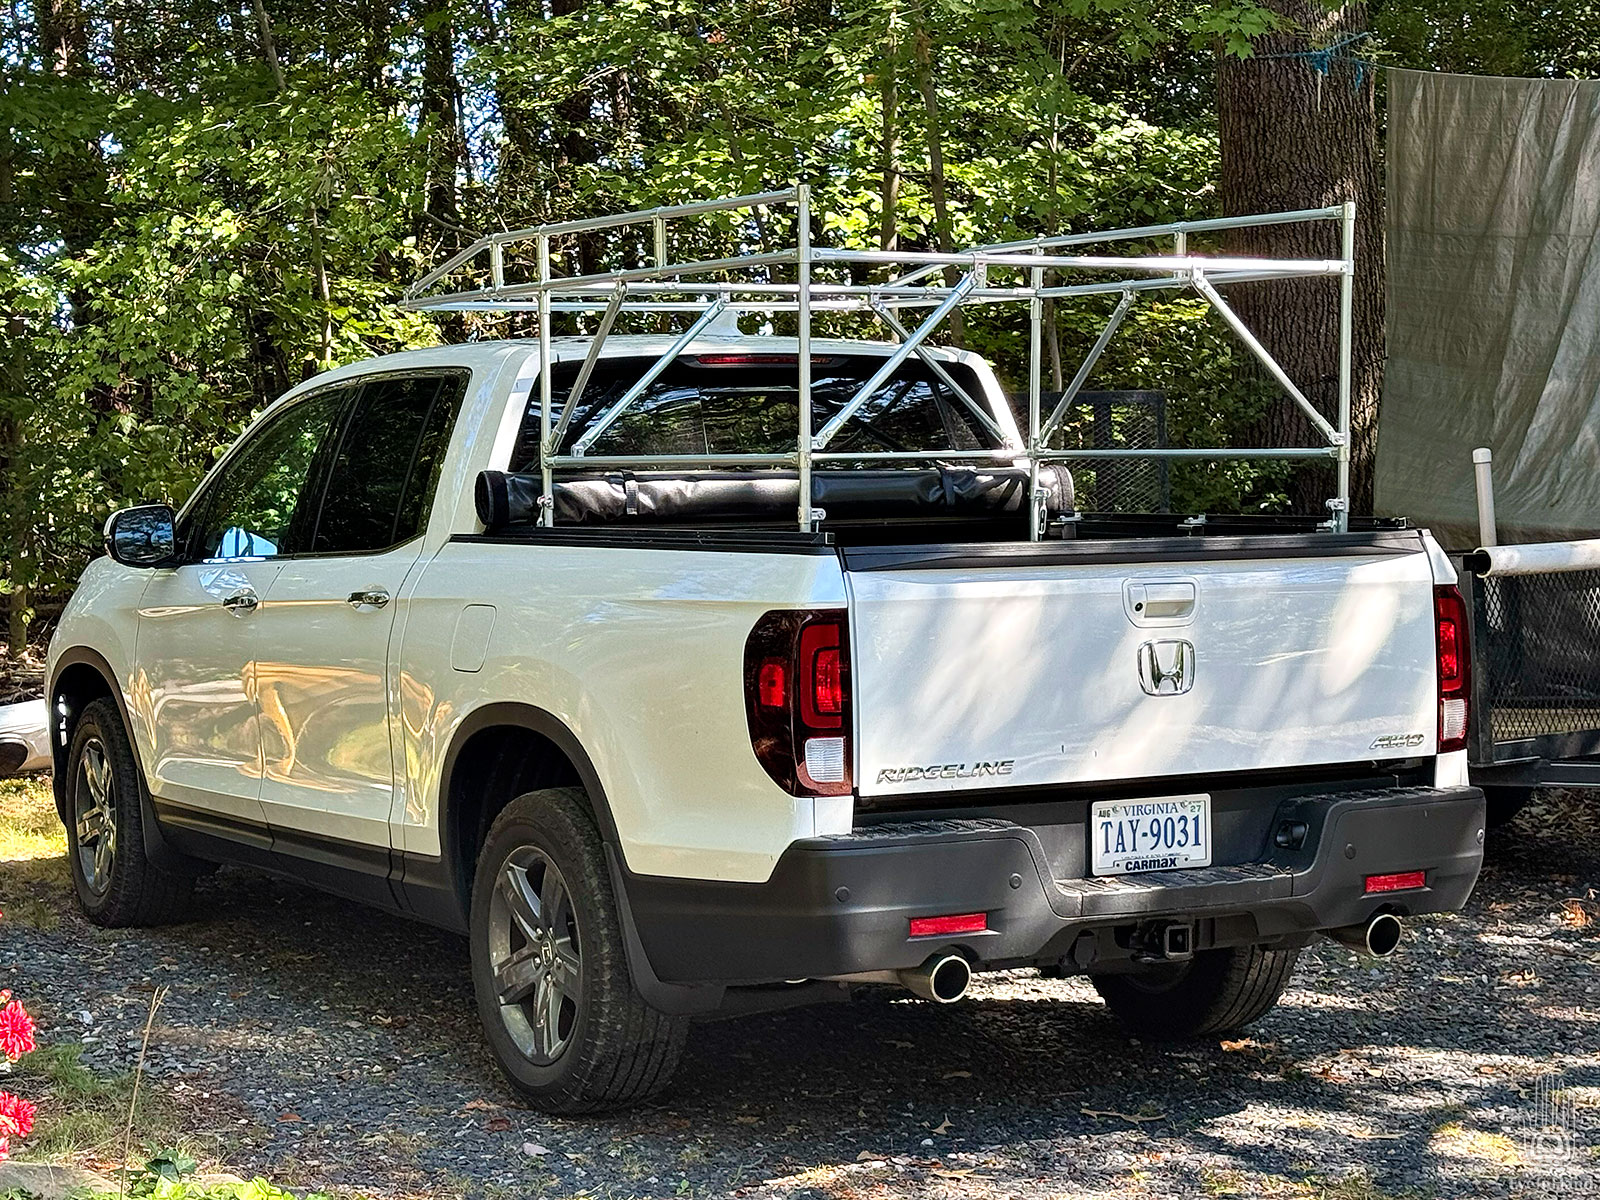
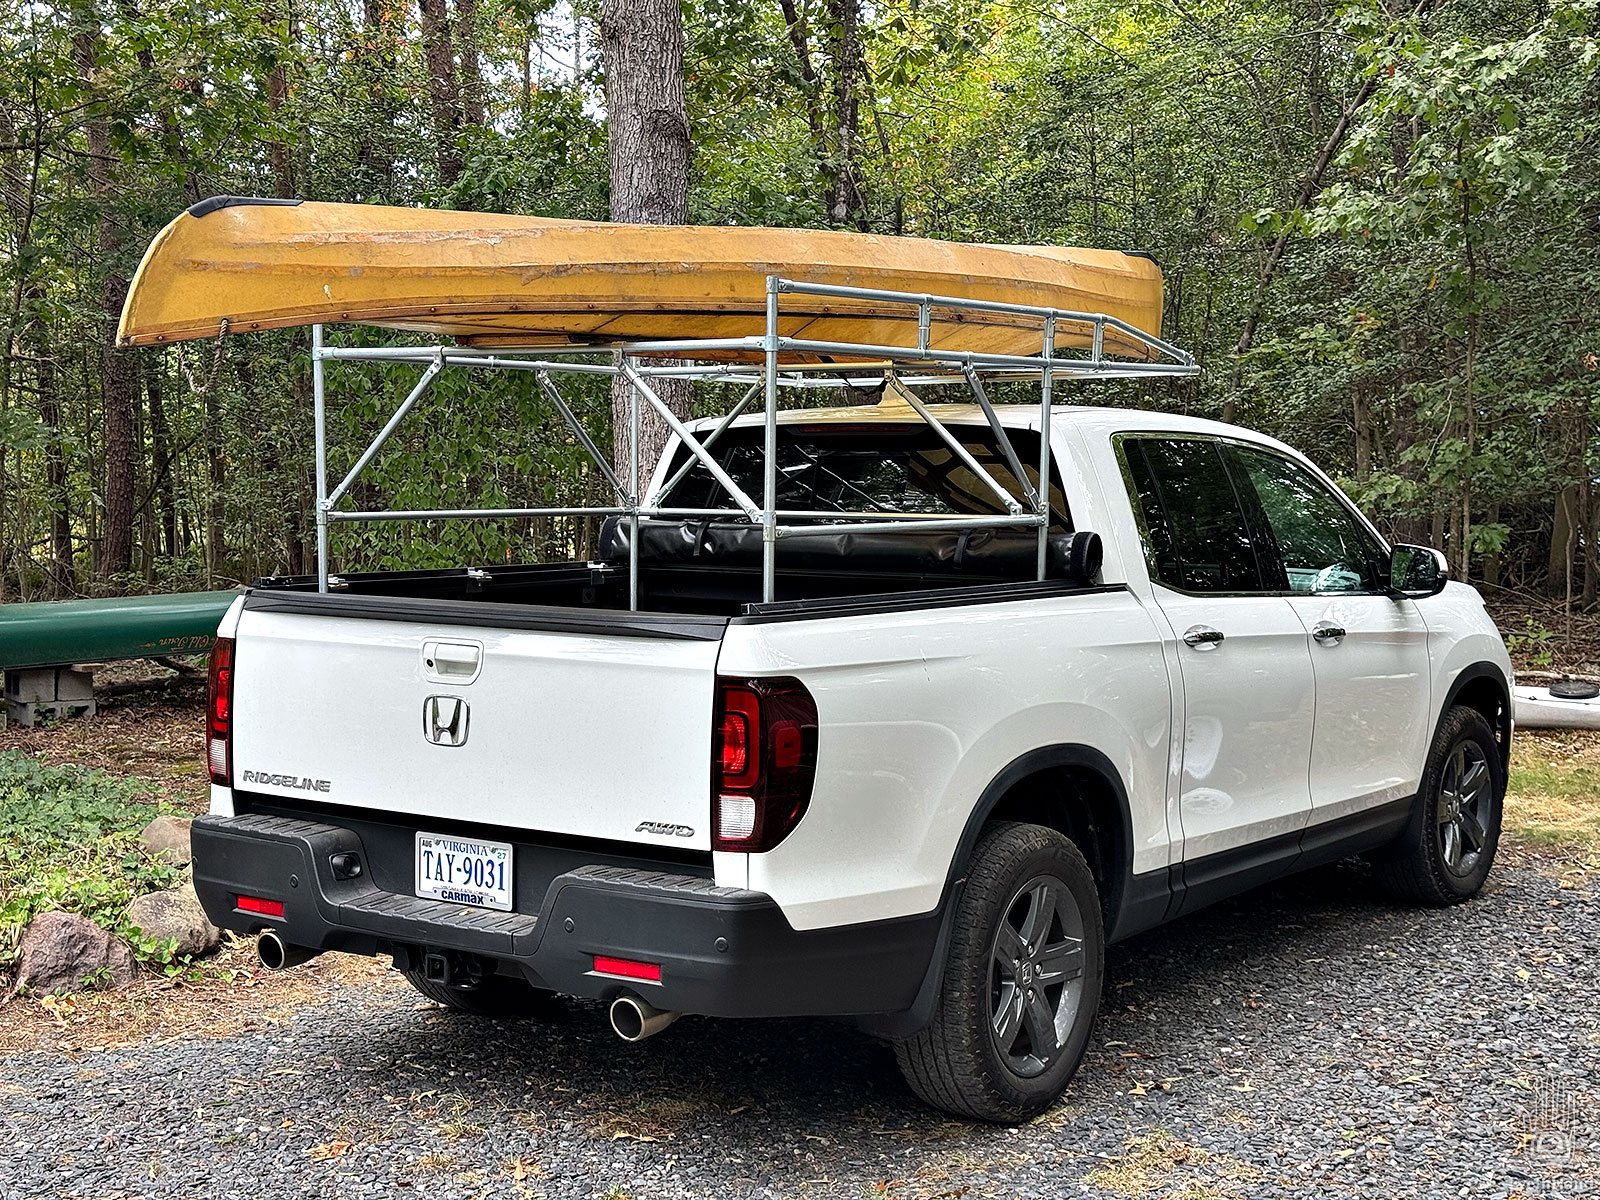
So we traded in the Subaru for a used truck that could handle the loads – a Honda Ridgeline that we’re really happy with.

The bed is too short for 17 foot boats, though. It came with a soft tonneau cover, but no roof rack. I could use the 3 ton utility trailer; but many of the local river launches aren’t big enough for that. And hooking up the utility trailer means no boat trailer, or bike rack. We need something more compact.

I looked at off the shelf ladder racks. These are heavy duty steel structures geared toward construction work, meant to stay permanently installed, which means wind noise and a hit on gas mileage all the time, whether you use them or not. It would also mean removing the bed cover. What we need is something lightweight for the kayaks and occasional long lumber, that’s quick to install and remove, so is only on the truck when needed.

Example of a perfectly serviceable wooden rack

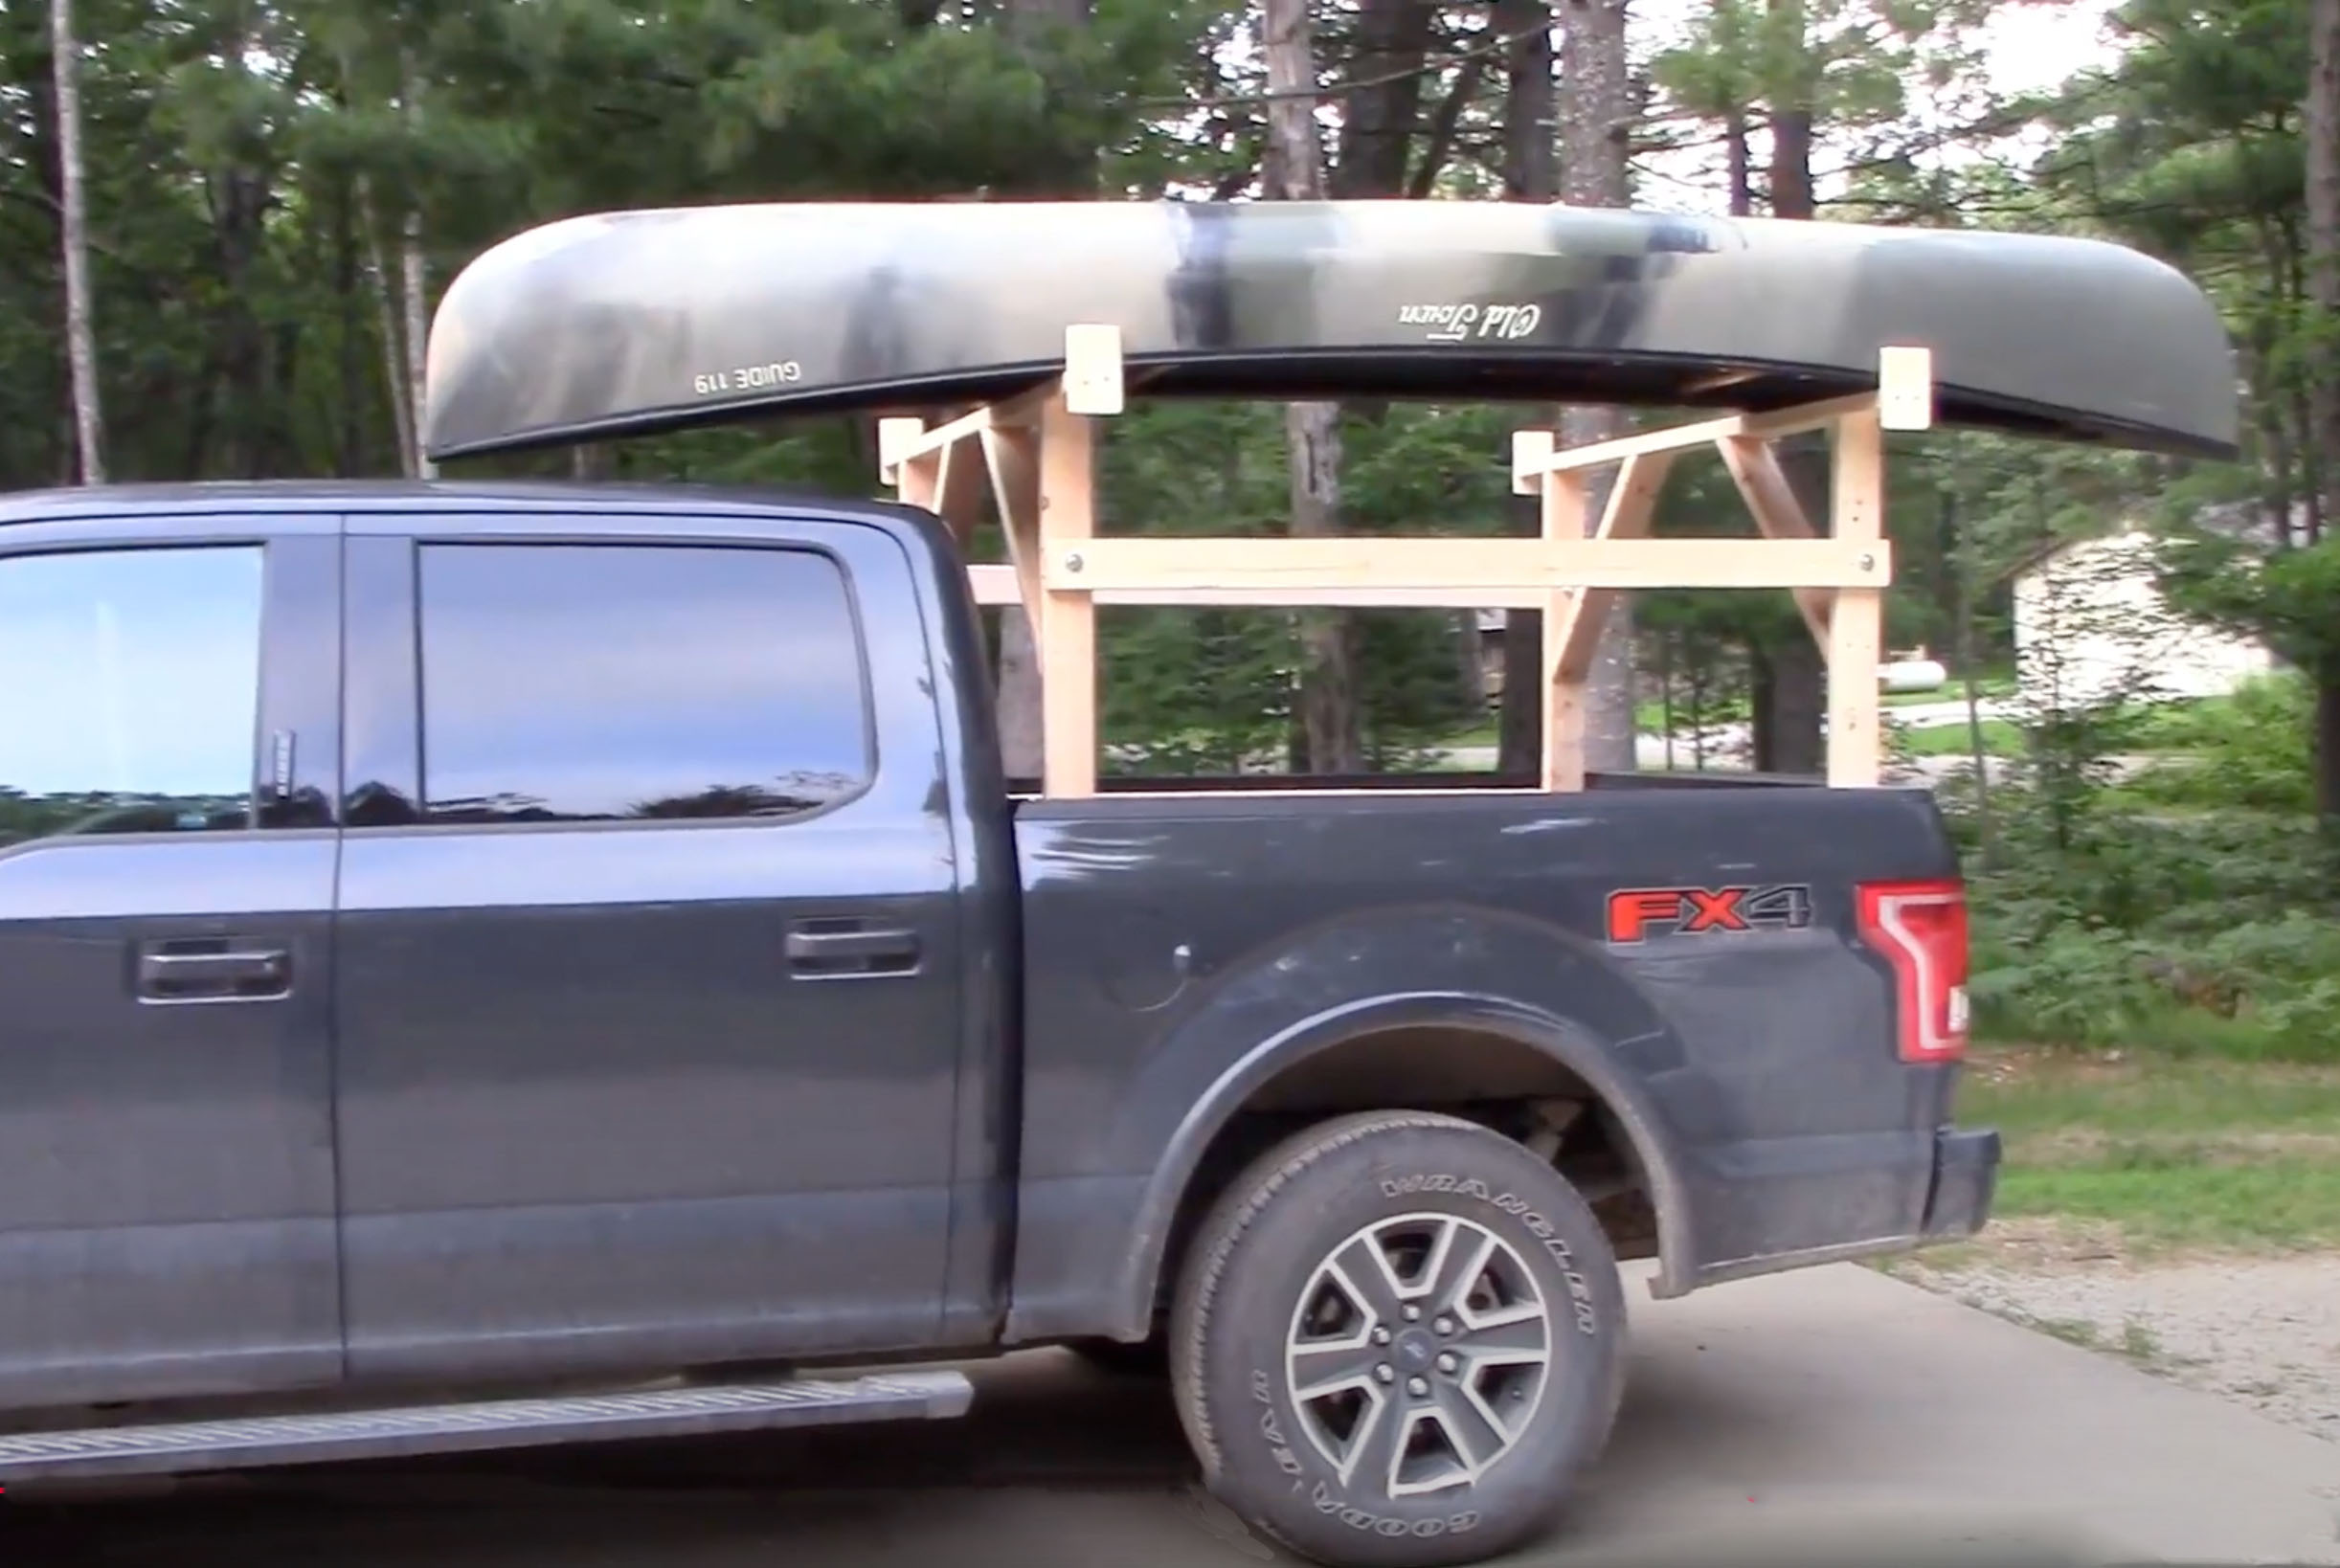
The obvious quick and cheap solution is a homemade rack made of 2x4s that just sits in the bed. You can find examples of these online, many are well done. I don’t have a garage to store it in, though, so after sitting out in the weather I’d have to rebuild one every year, or disassemble it for storage. Pressure treated lumber would help with rot, but is heavy. All little annoyances that add up to too much hassle to just go for a short paddle or to fetch something from the lumber yard.

Searching deeper for ideas, I found a small company called Maker Pipe. I came across them years ago when they were running a successful Kickstarter campaign. They manufacture connectors to build all sorts of things out of EMT Conduit. Seemed like a cool idea at the time, but I had no idea they had spun up into a permanent business. Good for them! They’ve taken the idea further. They now make a variety of connectors for different needs, and their website and Youtube channel are chock full of useful fun ideas and helpful info, all geared to small projects like this.

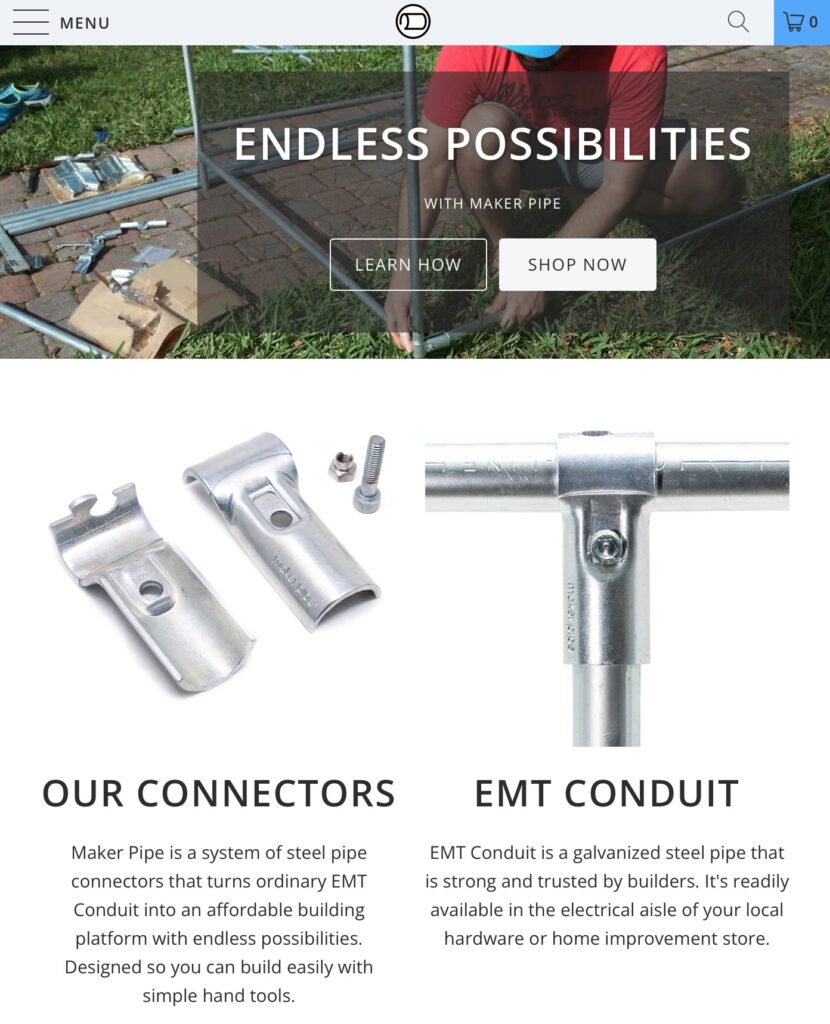
EMT Conduit is galvanized pipe used for running electrical wire, especially in commercial construction. It’s mass produced in 10 foot lengths, which keeps the price low, and is readily available at any hardware or big box store. It’s rigid and strong, bendable, cuts with a simple pipe cutter, and because it’s galvanized inside and out, is rust proof. Maker Pipe’s connectors are also galvanized, so anything you build with these components can stay out in the weather. The whole idea was interesting enough to give it a try.

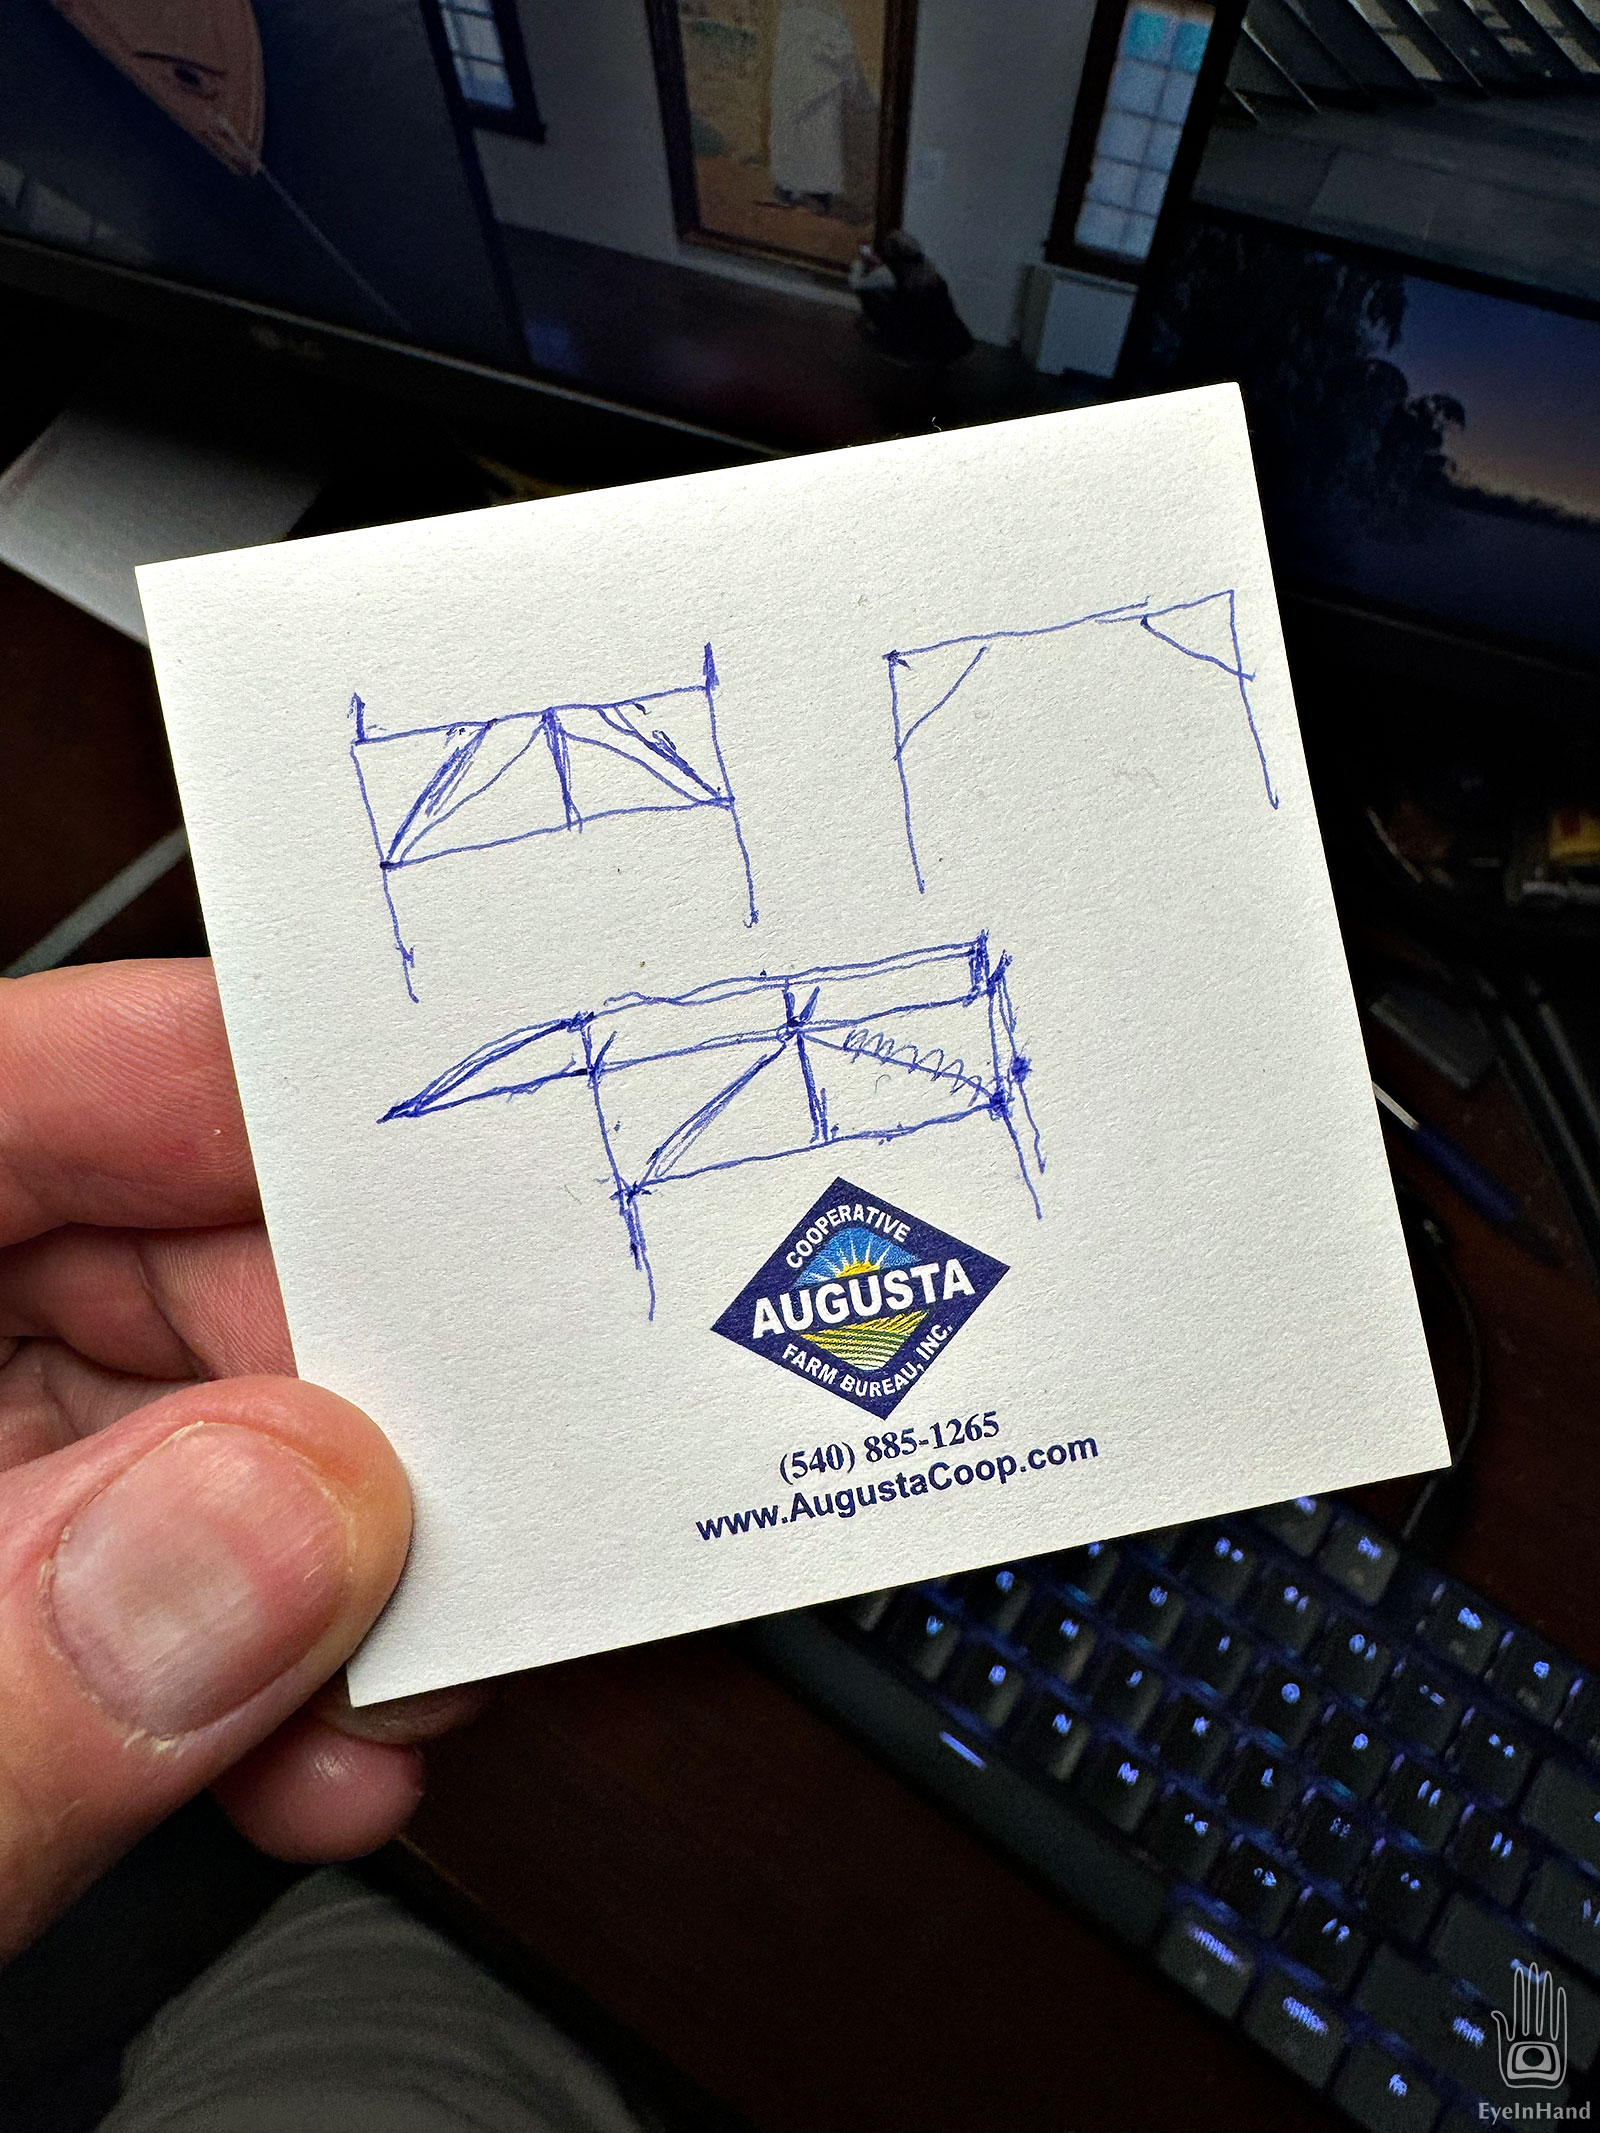
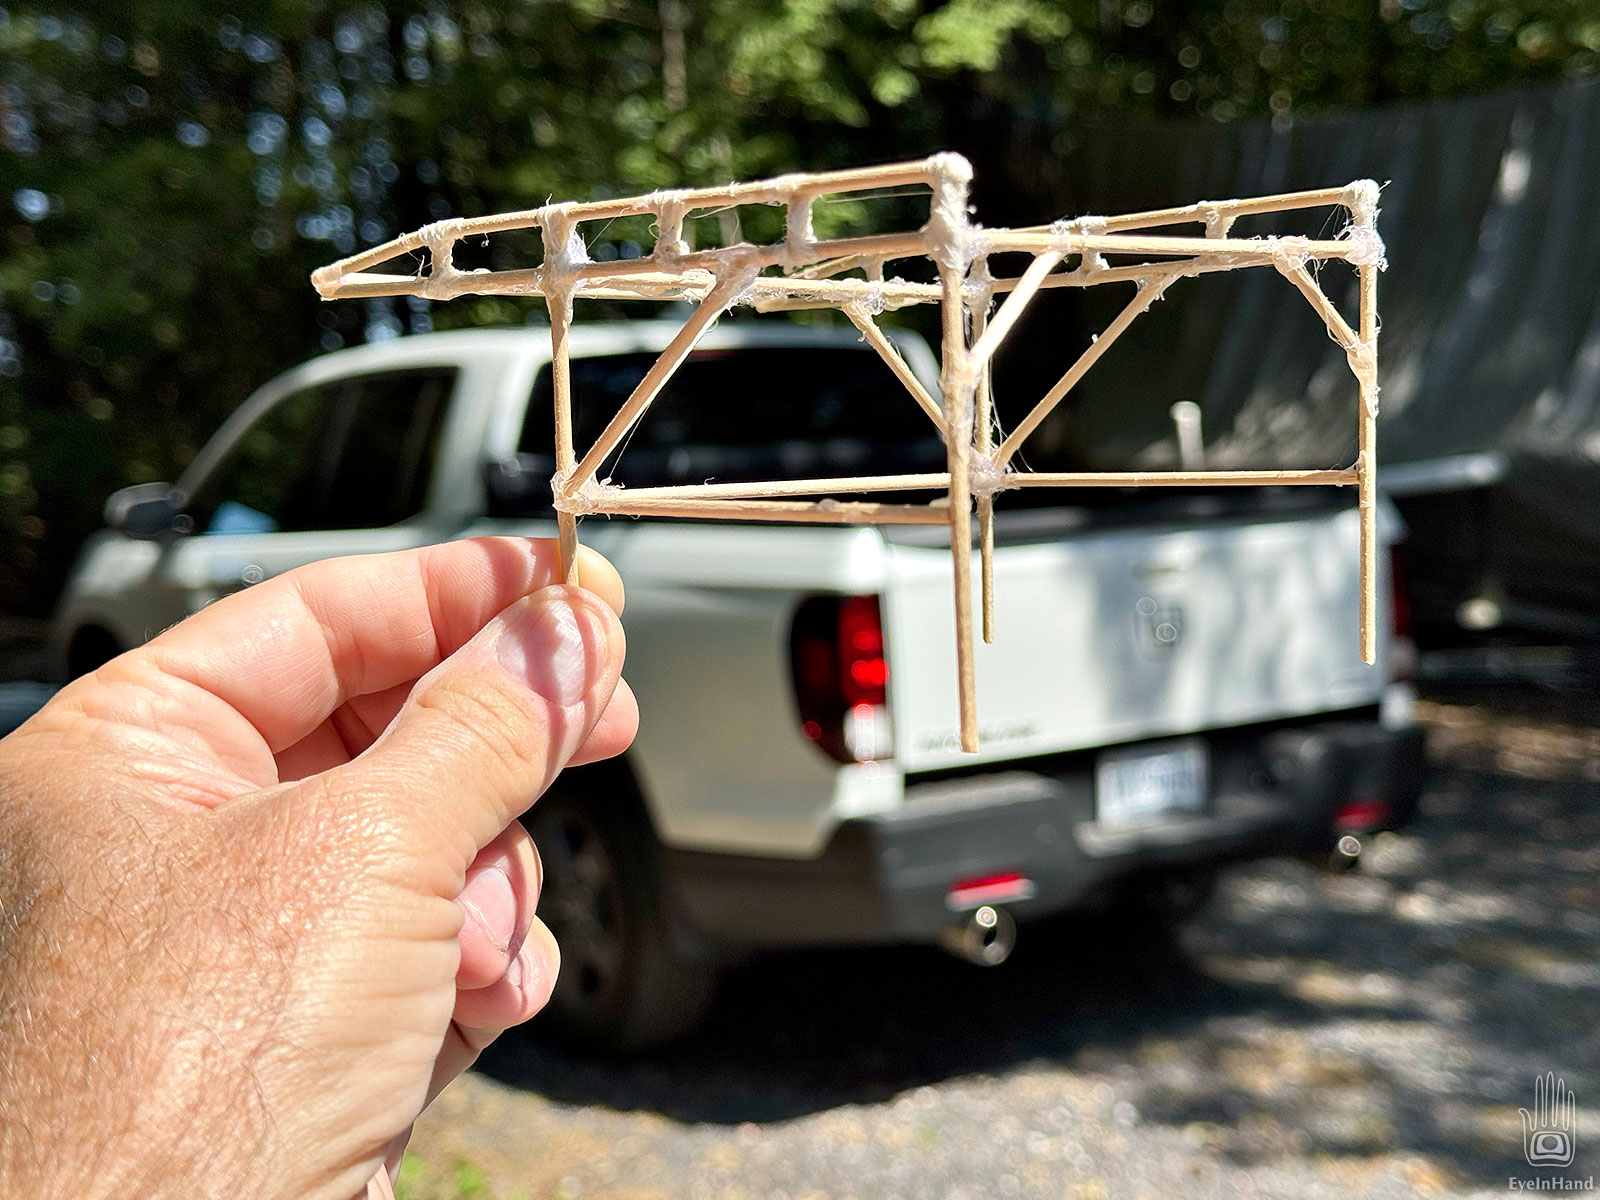
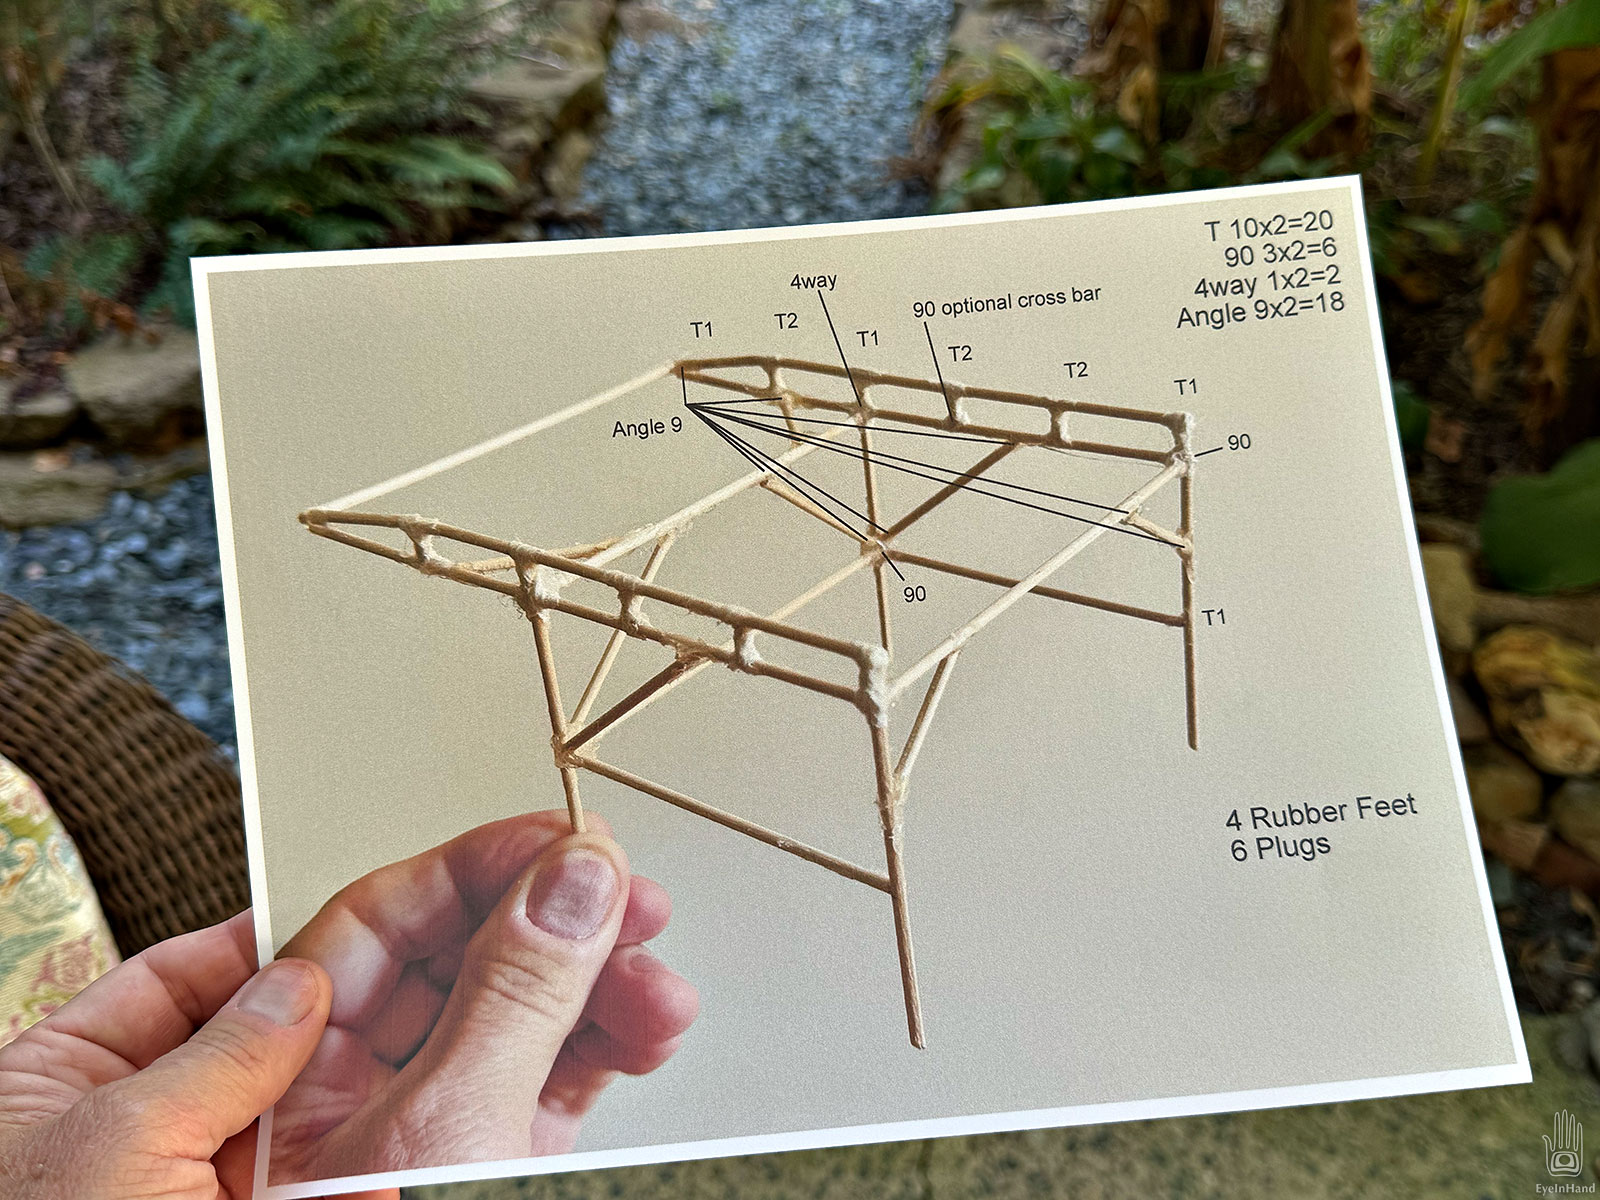
I started with a sketch, then made a model with sticks and hot glue to see how it would all come together.

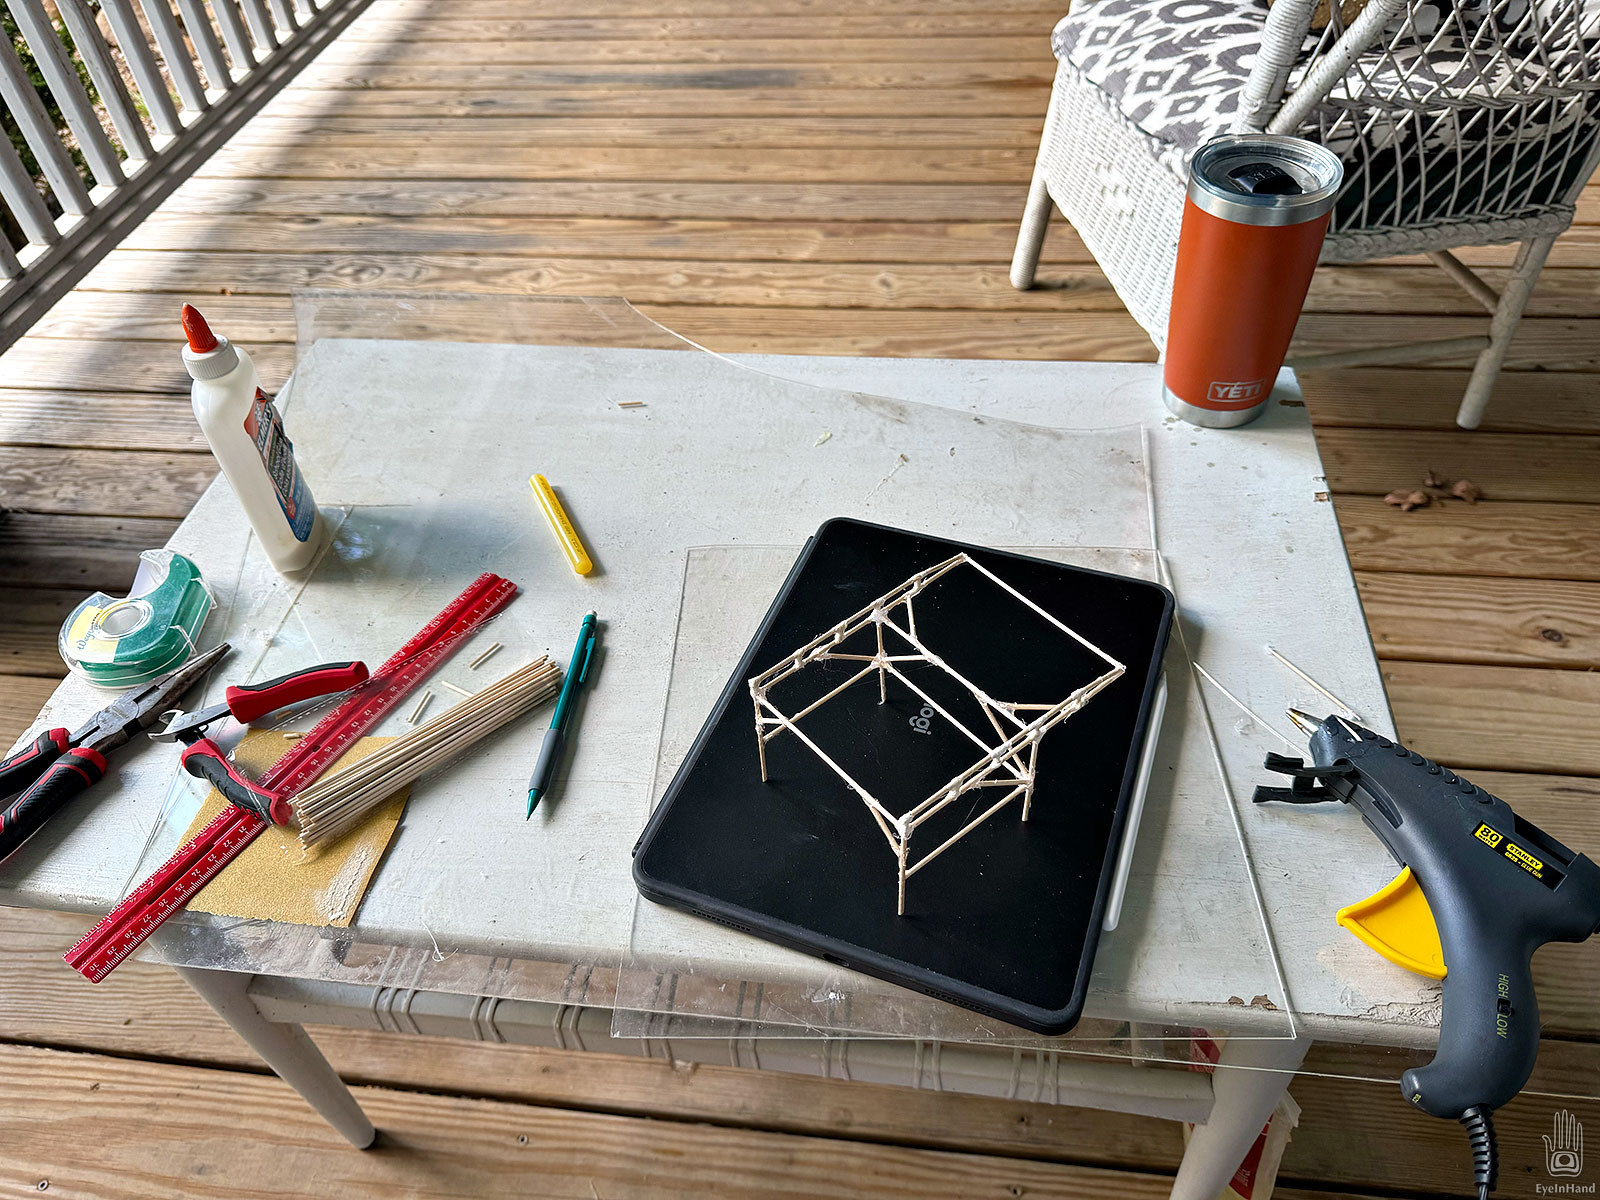
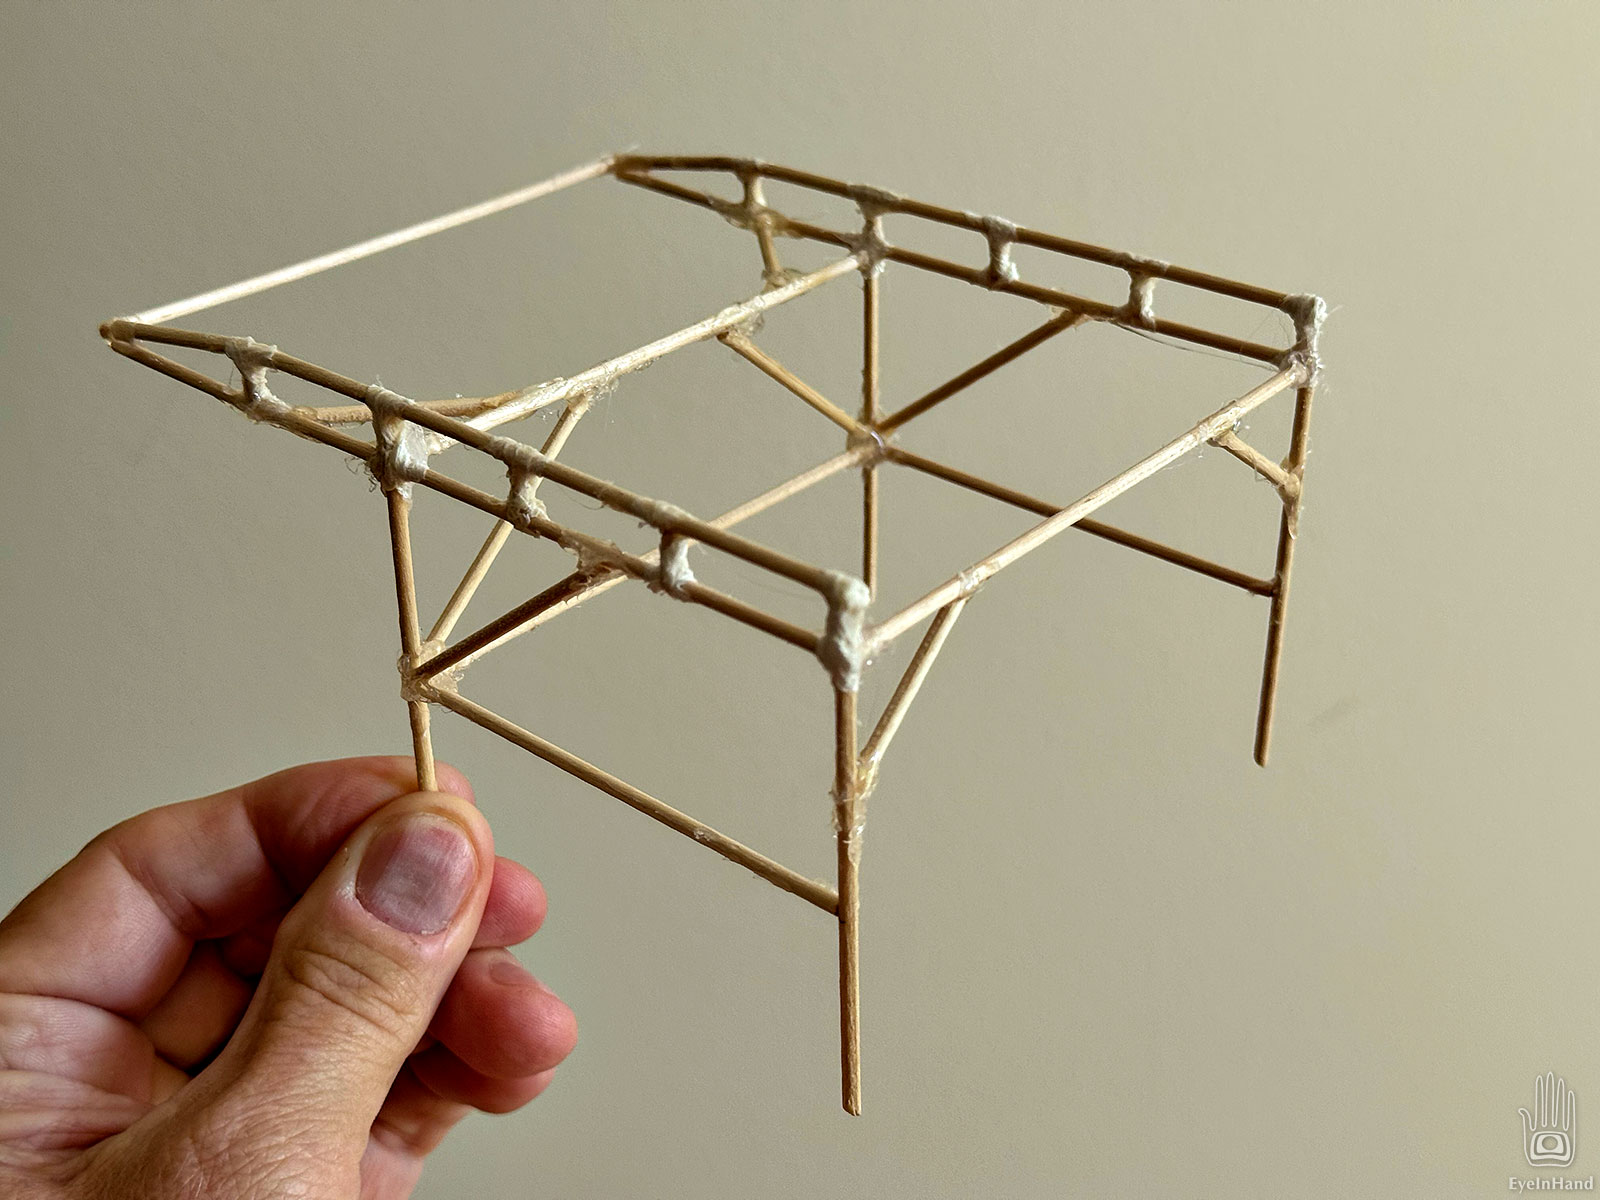
There were some things to sort out, like access to the trunk, leaving the rolled up cover in place, clearing the roof and shark fin antenna, etc. Then I printed a diagram to count up the various connectors and pipe needed.

Initially, I was going to use 1 inch conduit. Based on some fun non-scientific tests by the Maker Pipe team, it’s roughly twice as strong as ¾” pipe.

But 1″ pipe is also twice as heavy. Doing a little math I realized it would be pushing the limit of something I could lift and move around easily. Since I still have the utility trailer for heavy duty jobs, going lighter for this rack makes more sense.

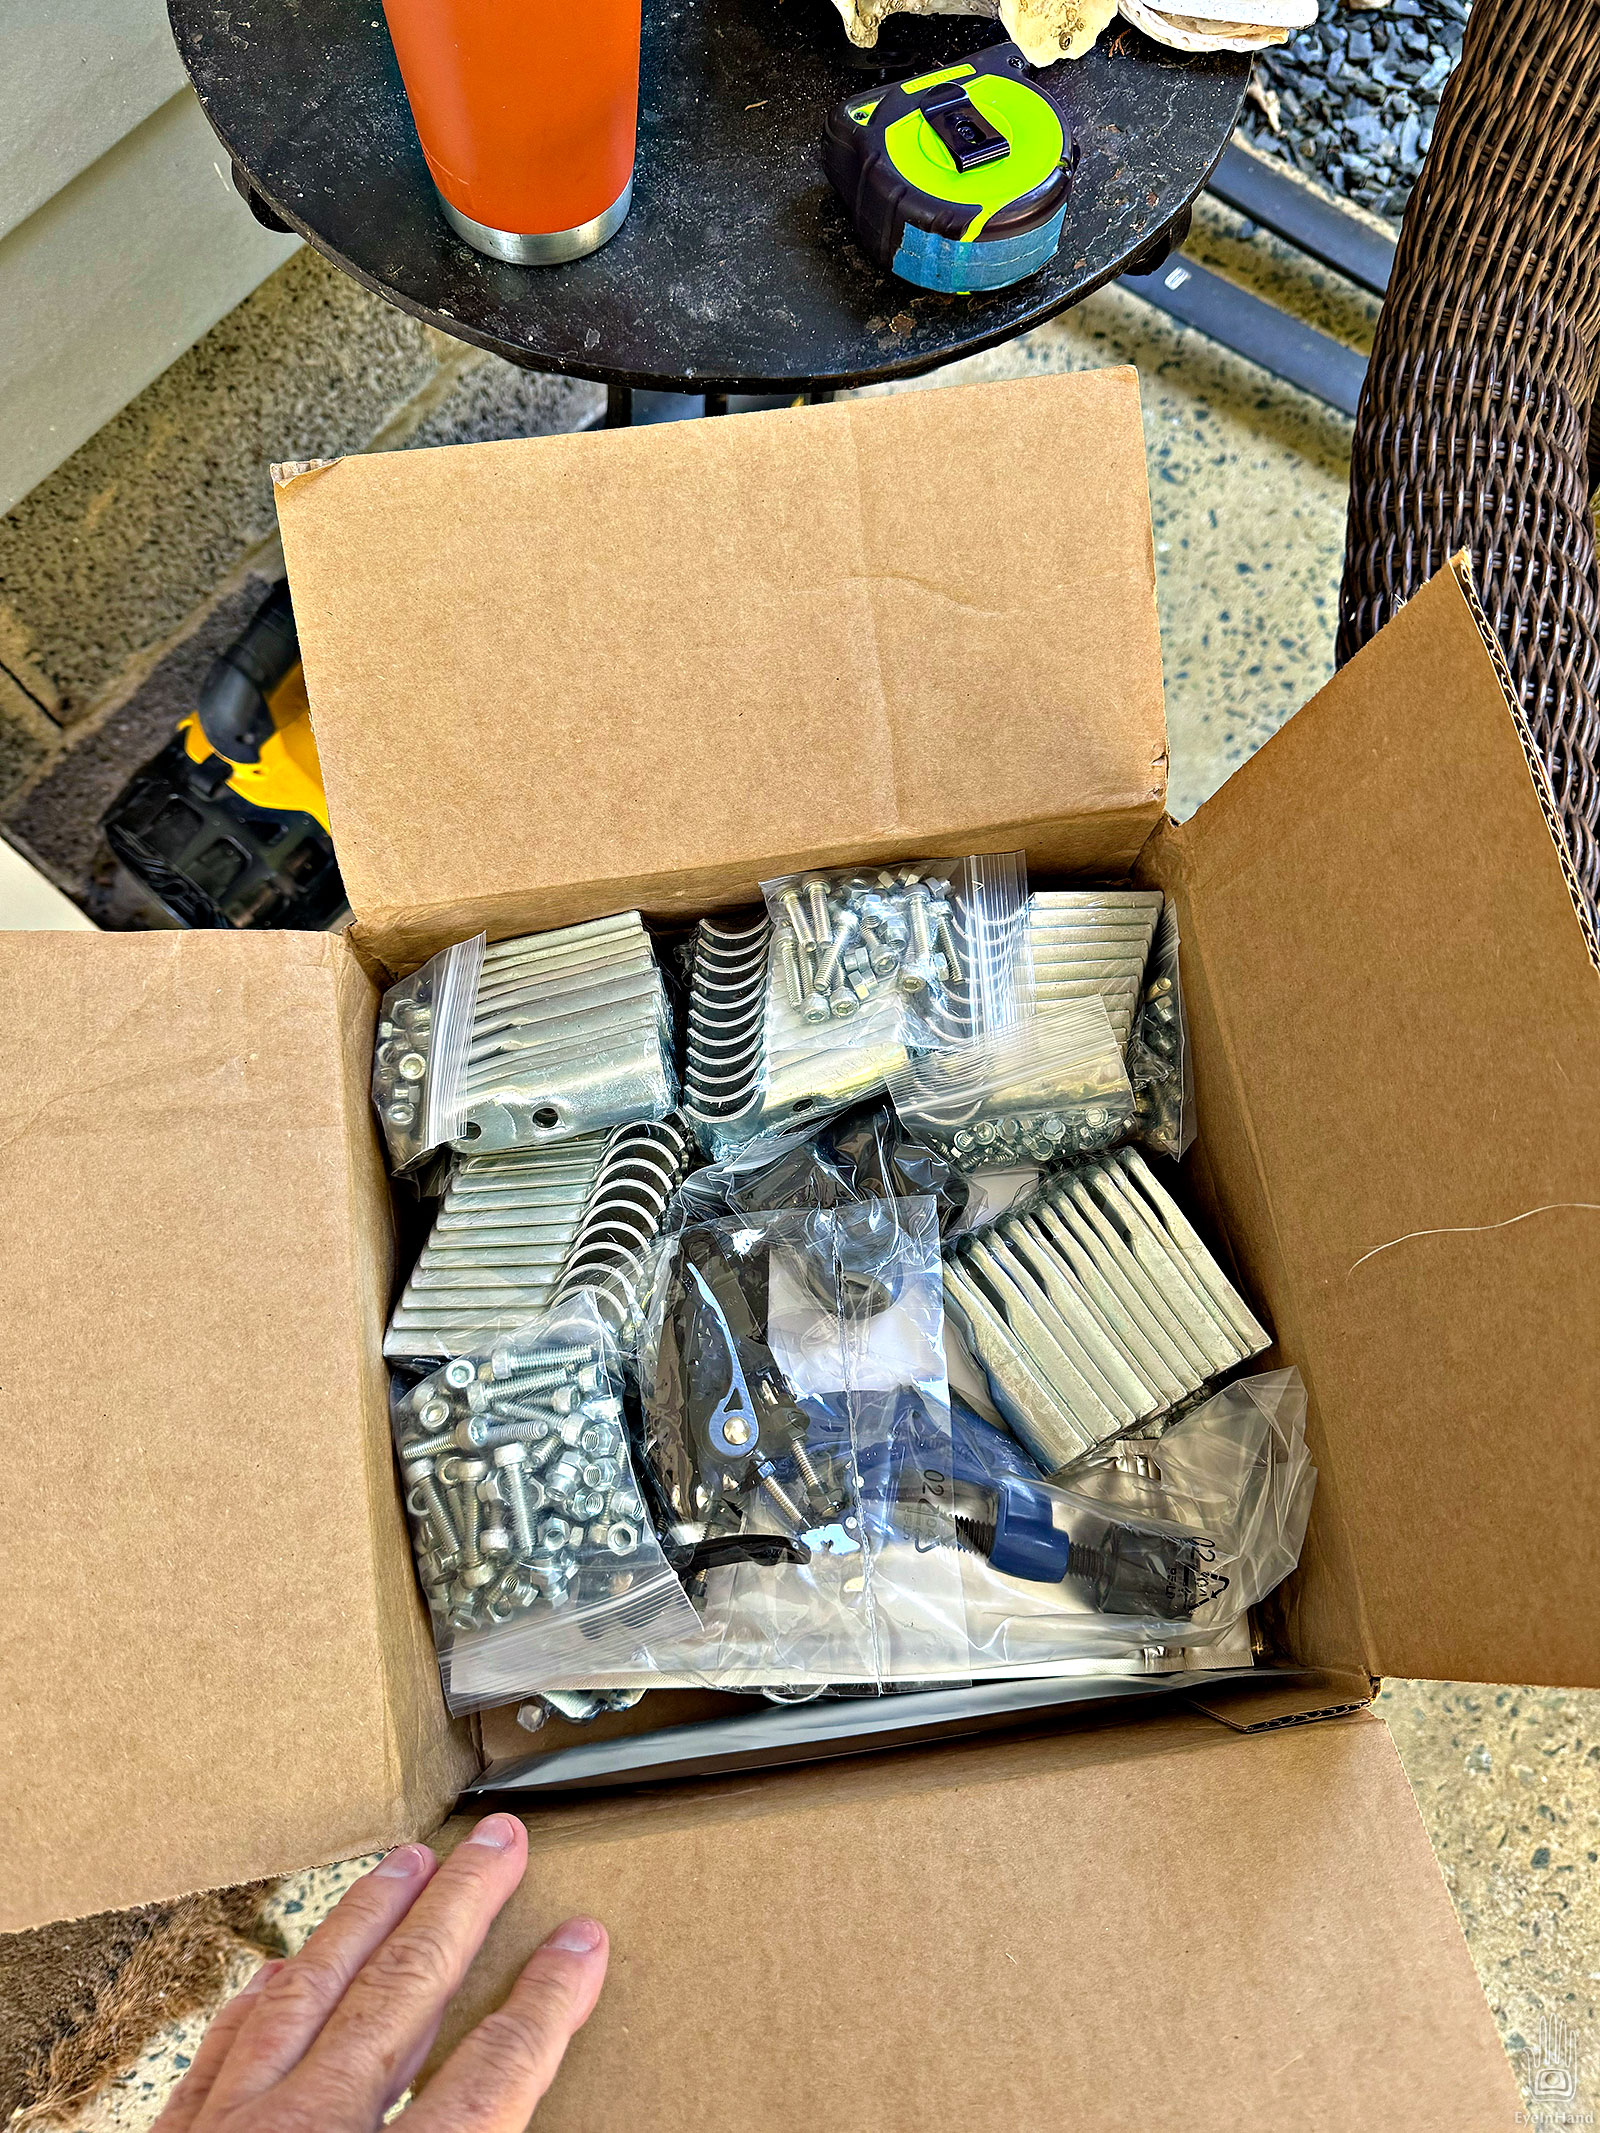
The box of connectors arrived in a few days, everything nicely packed.

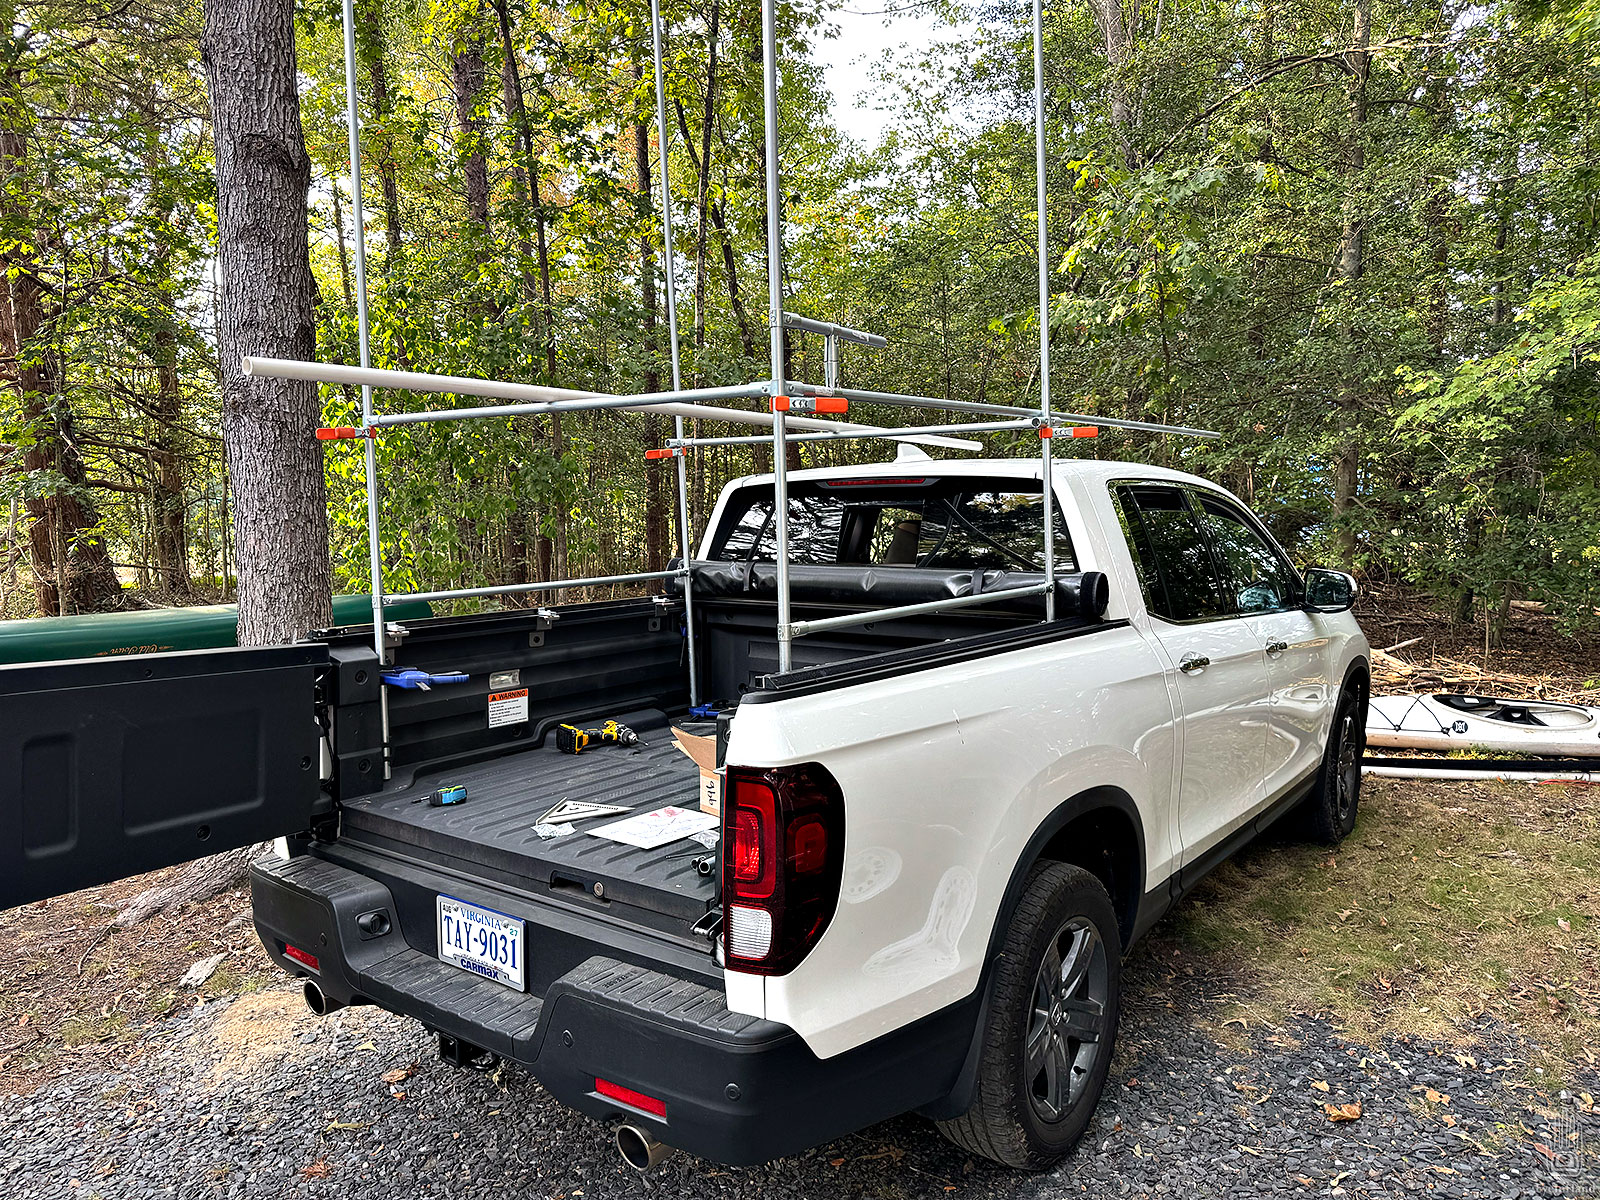
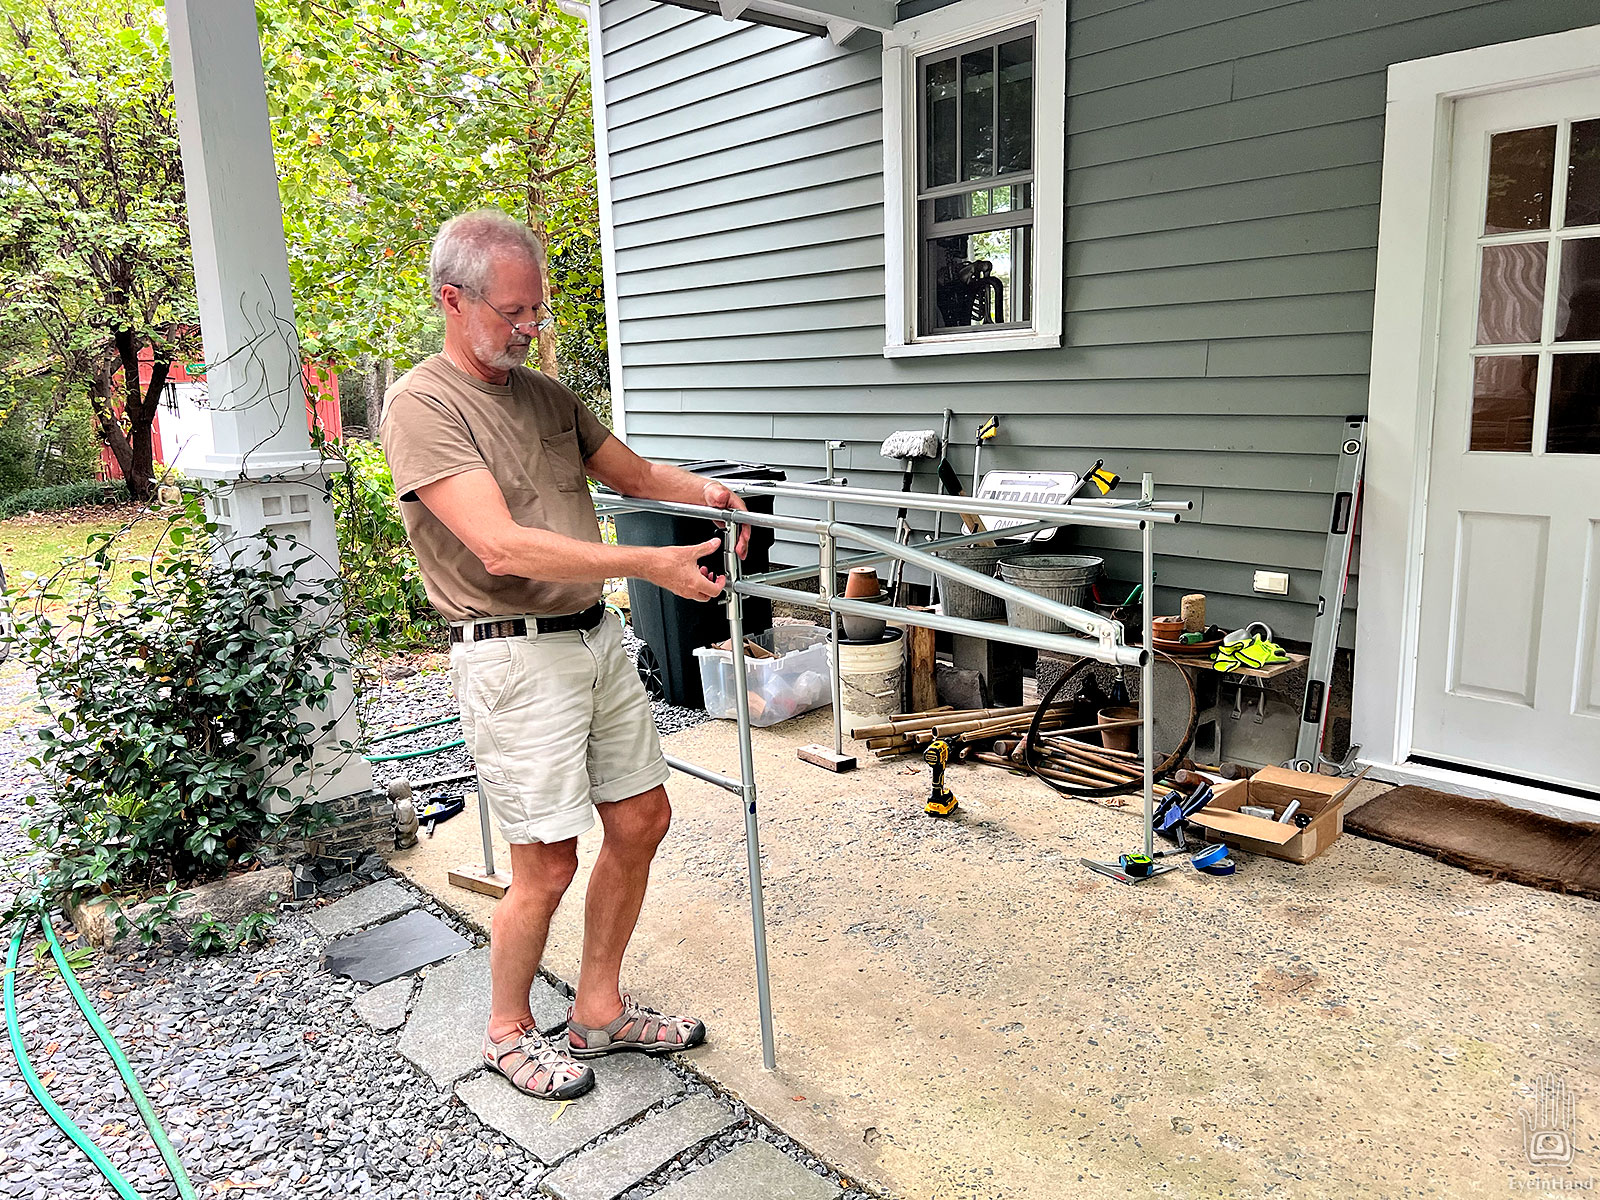
I did some mockups on the truck with clamps and pipe to get final measurements. Then the whole thing went together in couple of hours. Only tools needed were a pipe cutter and a 5mm hex key Allen wrench.

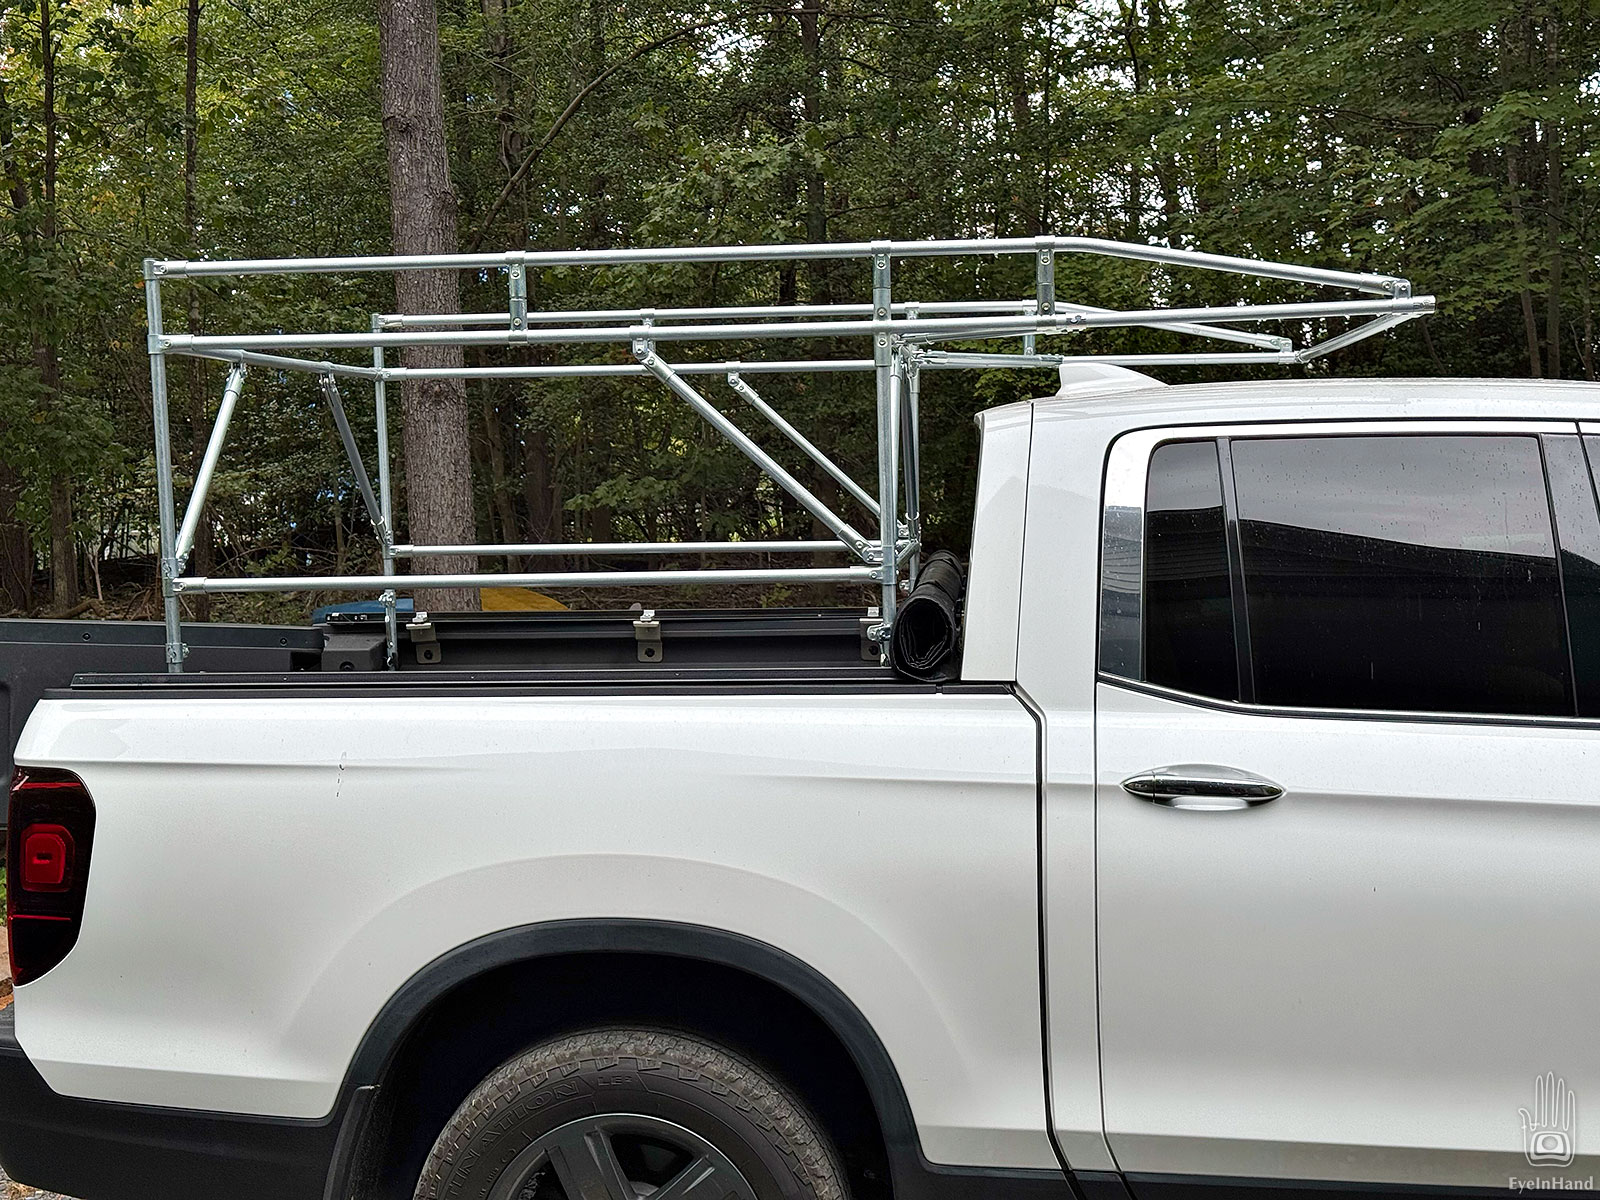
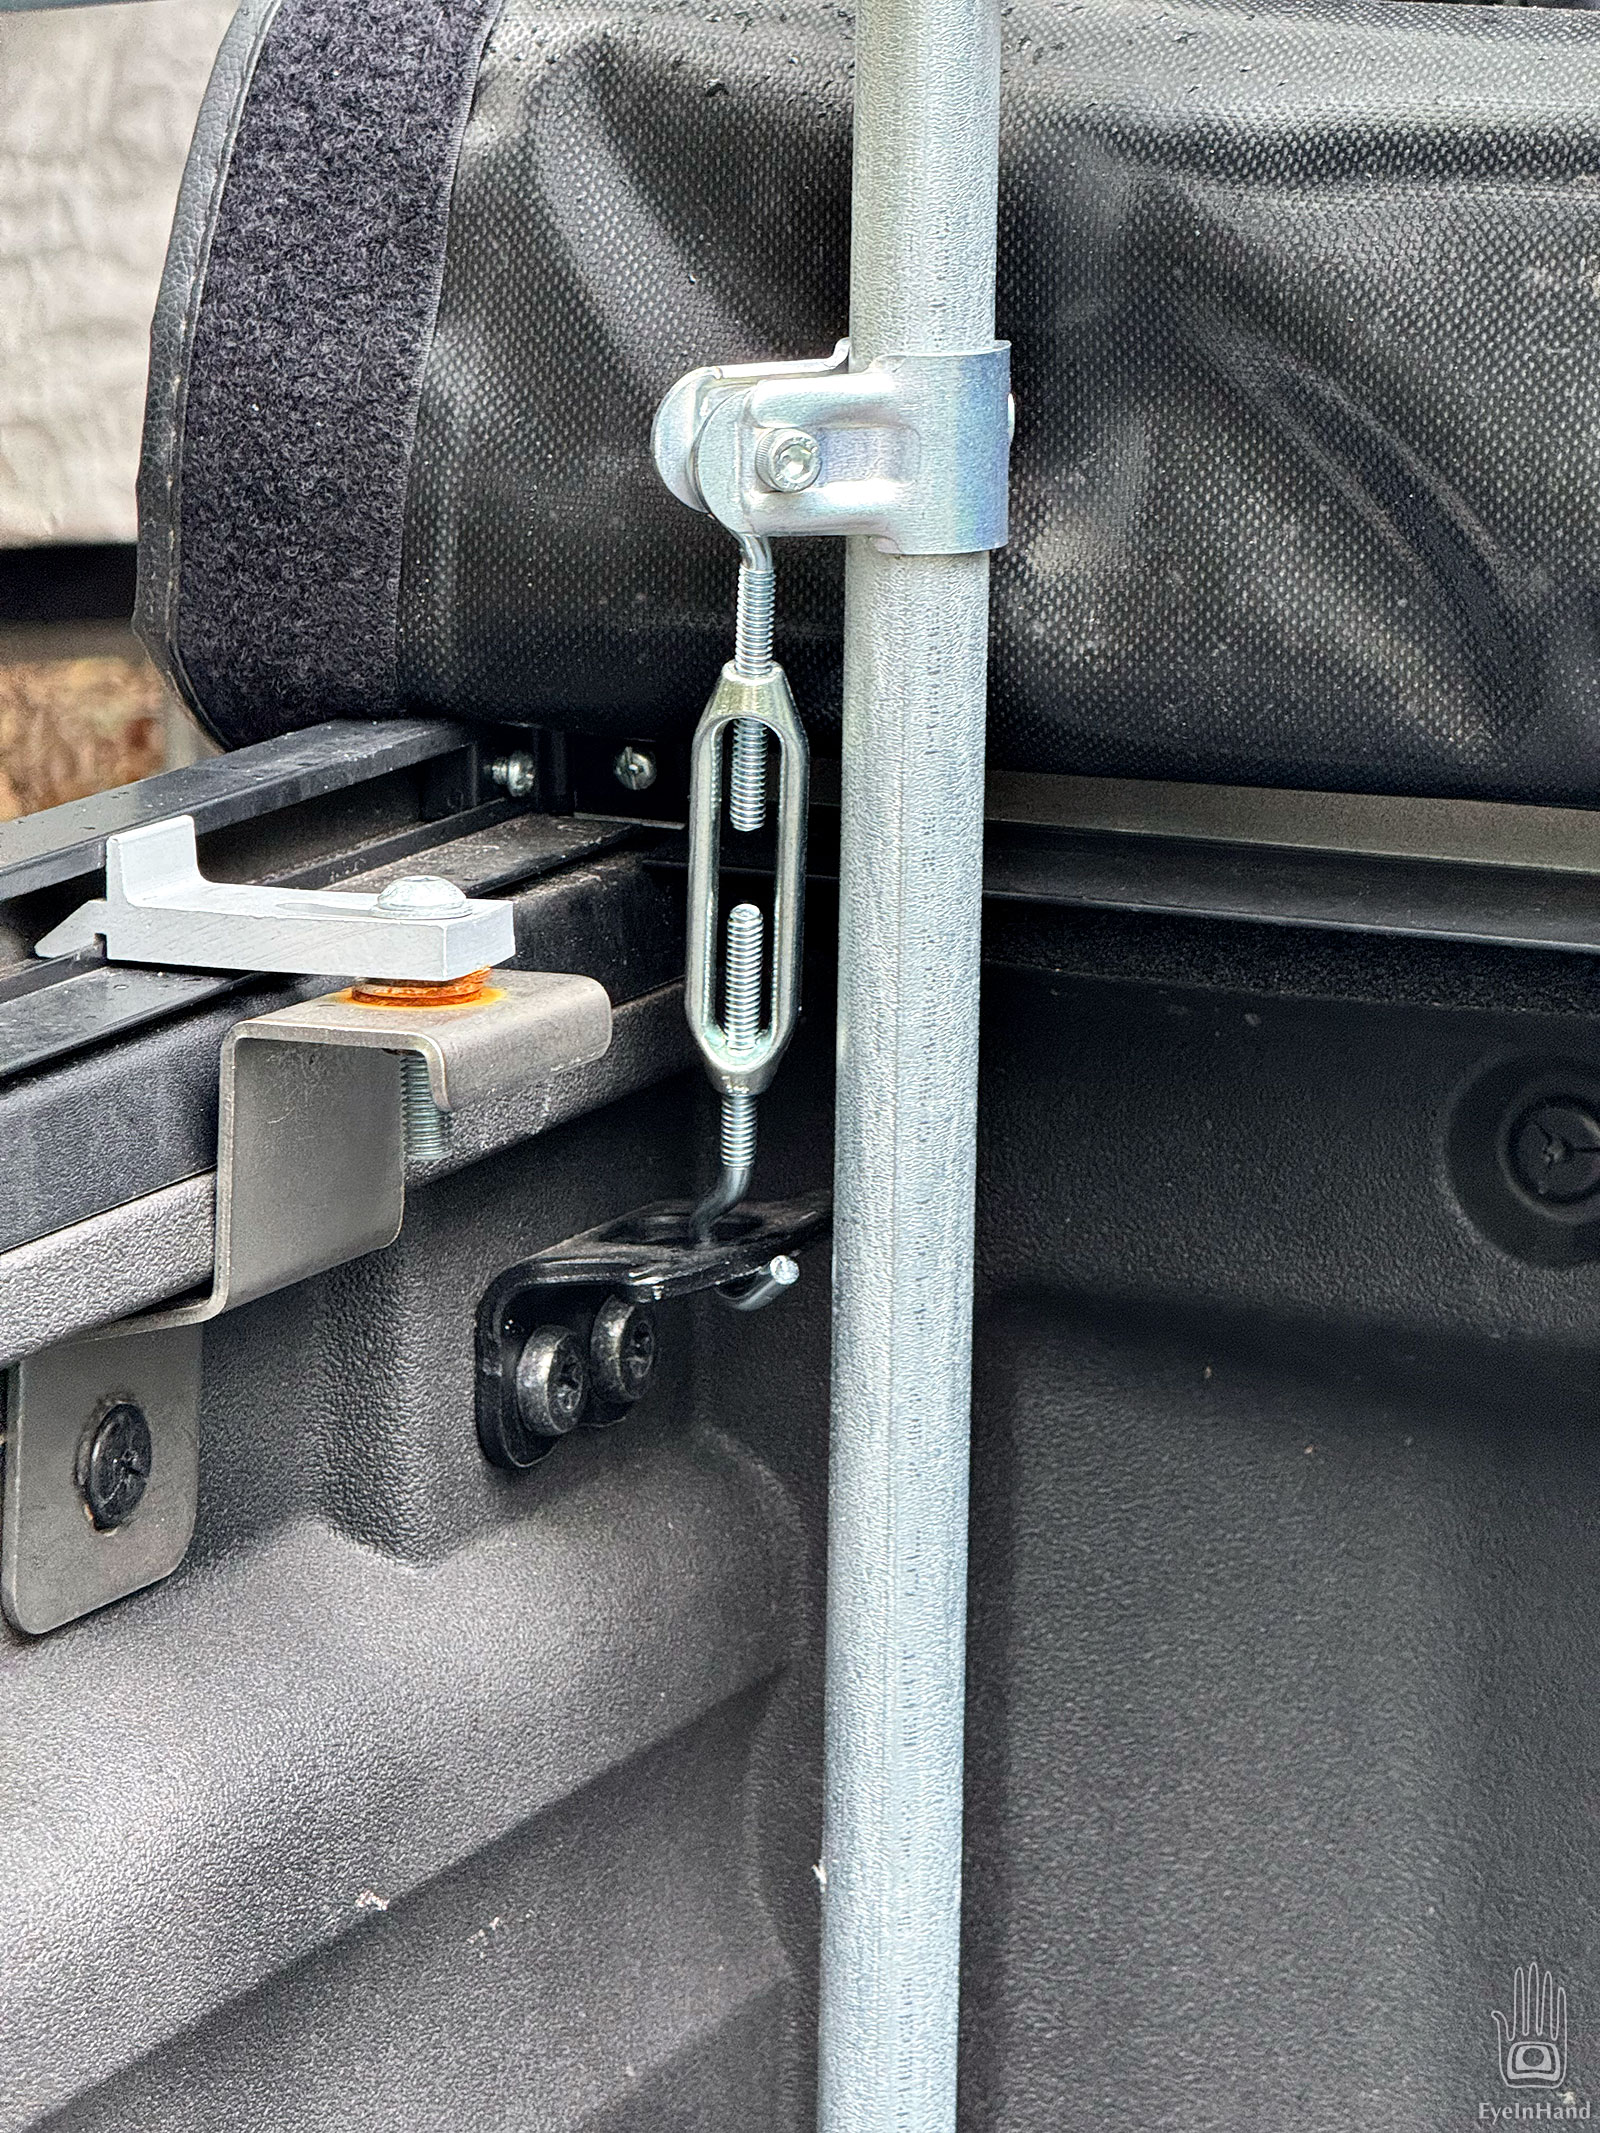
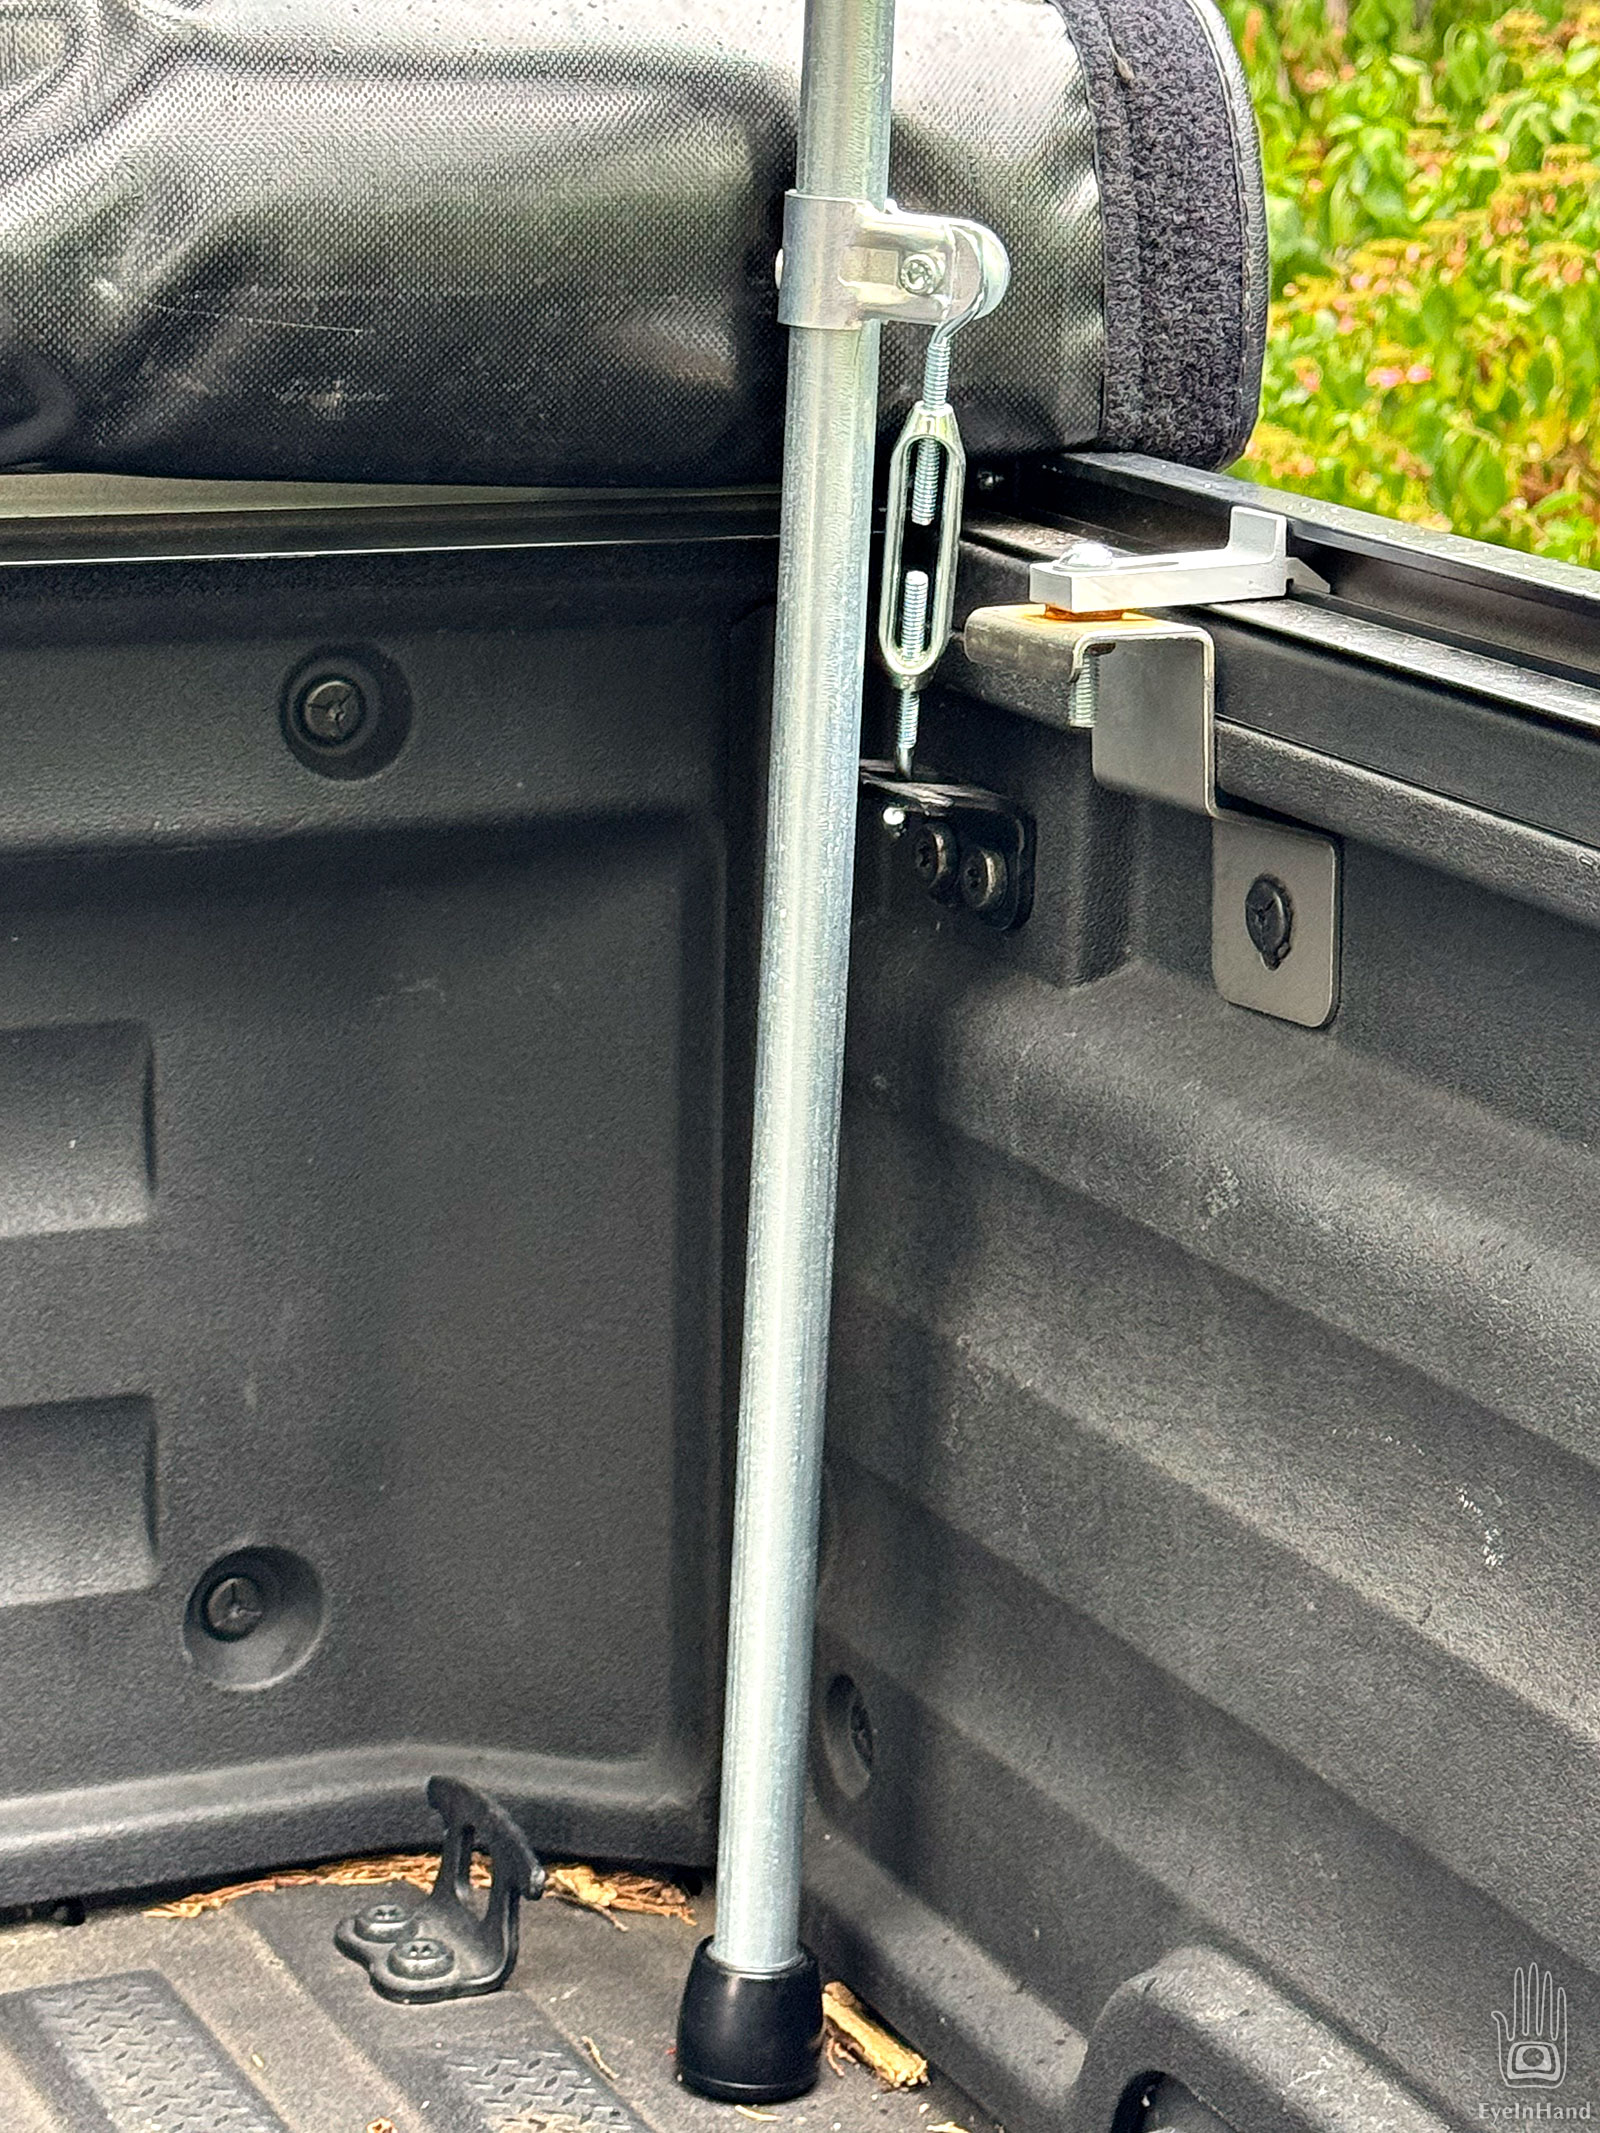
Next day I tested the fit and locked it in with turnbuckles to the existing tie down cleats in the truck, and went for a drive. There’s some wind noise at highway speeds, but not as bad as expected.

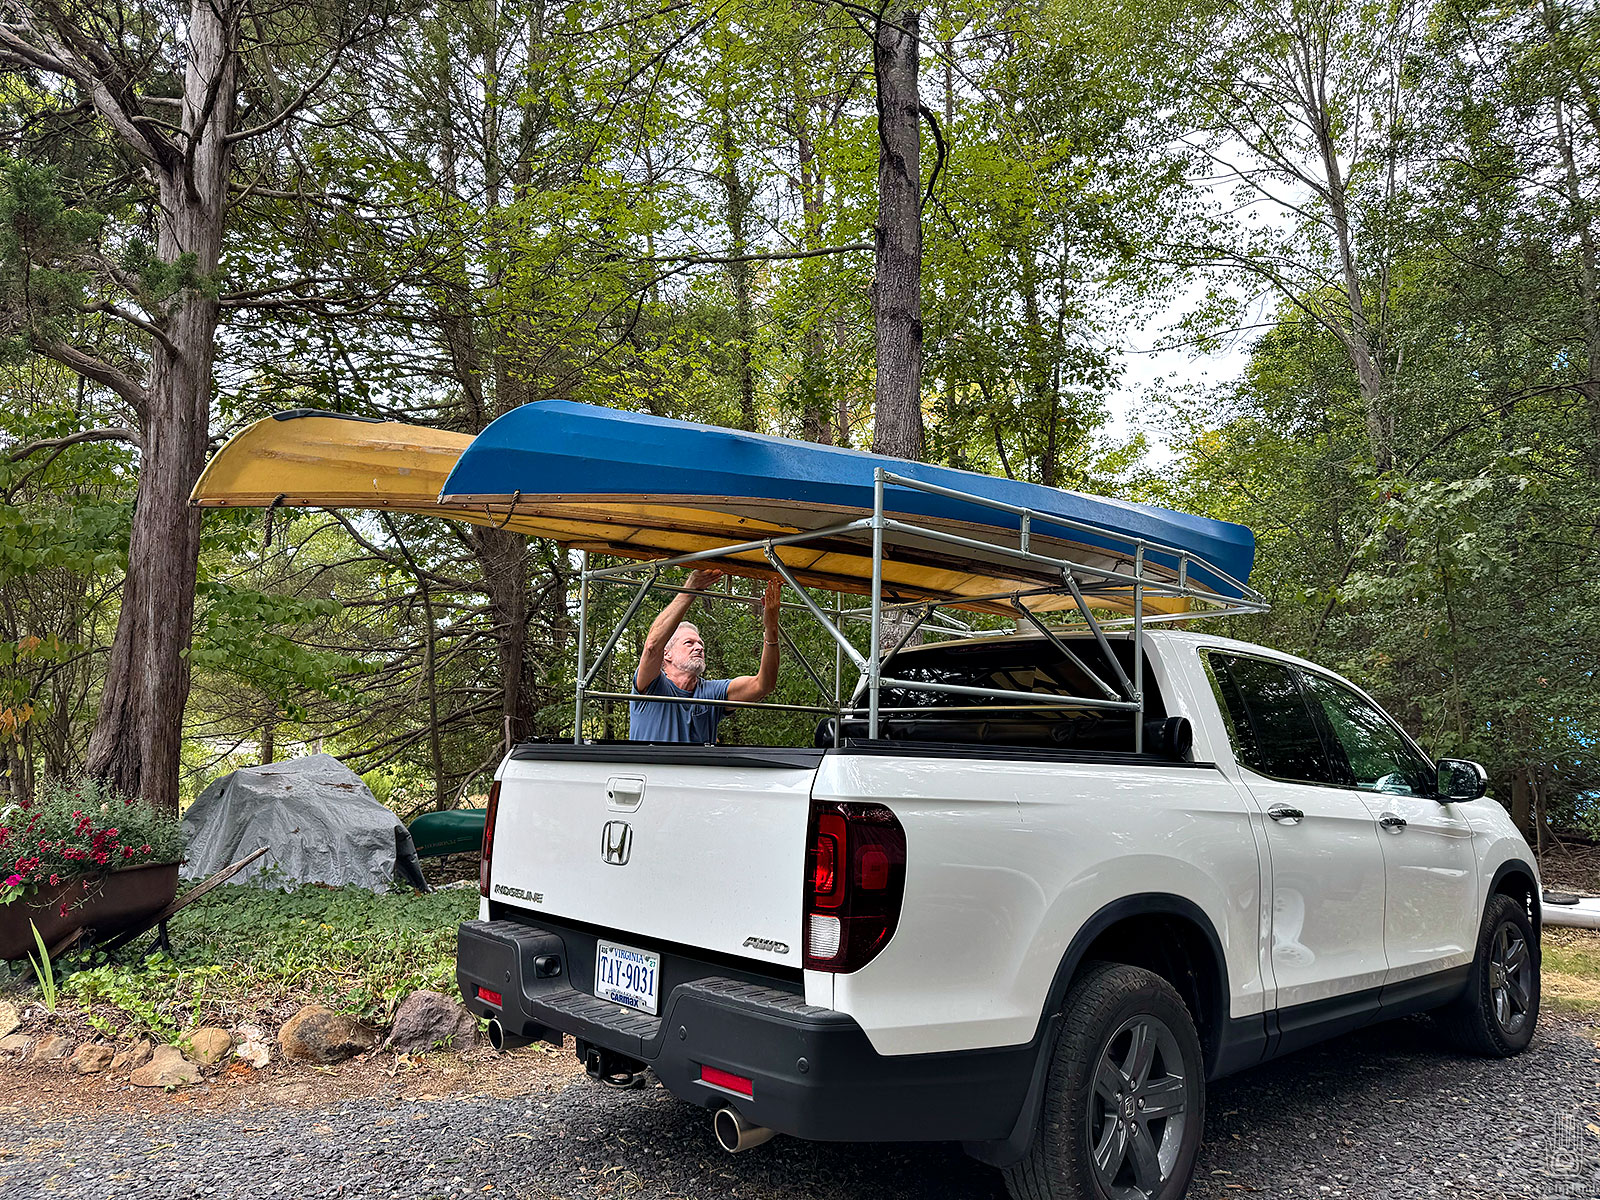
Final test was to throw a kayak on top and go for a paddle. Works great. Only takes about two minutes to lift it in and lock it down. And bonus, it fits nicely in the trailer.

With no further adjustment needed, I dabbed Loctite on all the nuts. Between temperature changes and vibration, don’t want anything jiggling apart at 70mph.

Overall I’m very happy with it. If it lasts 10 years I’ll be even happier.

Axe Handle Table Project

The axe handle console table is done. I may add a coat of varnish when the epoxy cures; but probably not necessary.

It’s a fun art project, with a story.

The Slab Story

Long ago, a friend had an ancient beloved tulip poplar on his land, which had to be taken down. Hundreds of years old, it was easing slowly into the afterlife. He would have let nature take its course, but the old tree towered over their house. So he and a buddy had to cut it down. It fell with a crash that shook the whole house like thunder. They limbed and lopped the hulking leviathan until they tired of it, then hauled off what they could with a farm tractor, leaving behind the massive column of the main trunk.

He, like me, was a porch sitter. The big log laid in view from said porch. Time passed. Thrifty by nature, he realized it was a shame to waste such an impressive piece of wood. And he was sentimentally attached to it. Besides, it was too big to move, even with a tractor.

Many evenings he pondered what one might do with such a fine piece of wood, that big old log laying out in the yard.

John and I worked together then. We often egged each other on in various ill-advised endeavors. So, inevitably, he thought of me. I said I wasn’t interested, had a boat building project already. But every couple of months he’d bring it up again, with fresh enthusiasm and some new idea of what I might make with it. He convinced himself that no one in the world could make anything worthy of this old tree but me, and he spent a couple of years gently trying to convince me of the same. And eventually did. I was renovating the kitchen, and needed an interesting piece of wood for a bar top. This might do.

It wasn’t until I arrived, with nothing but a trailer and a come-along, fully intending to bring the log home, that John mentioned it was too too heavy to move with a tractor. He was known to leave out such practical details. In the intervening years it had settled into the ground. It wouldn’t budge. At all. No way. And furthermore, after all those years of John’s pondering, the wood had continued to decay, getting punky and worm eaten. But there it lay, and here I was.

I suggested the only option was to cut out a couple of big slabs with a chainsaw, and maybe take those. His face fell, but he conceded to the new plan. I went back for the saw. After a couple of hours of chaining, ankle deep in sawdust, sweating and dirty, I had one big slab of poplar – 8 feet long, over 3 feet wide, and 8 inches thick. Even that was too heavy for the two of us to lift, we had to drag it onto the trailer. I got it home, wrestled it into the shed, and left it.

Years later, when we started the kitchen remodel, I divided the slab again into two 4 inch smaller slabs. The widest one, from the center, was split in two and became a countertop and bar, which turned out nice.

That left the narrower outside piece, still in the shed. Where it stayed for 20 years.

Original bar top slab

The Table Project

I got tired of moving that slab around the shed, but couldn’t bear tossing it out after all it took to get there. Next to it was a spare axe handle. Moving them both yet again, I noticed the handle shared a similar elegant S shape with the legs of a table T inherited from her grandmother.

Hmm. We could use a new table. Axes and timber go together.

I went to our local hardware store and got three more handles.

The challenge was to cut clean mortises for the tenons, the head of the axe handles. Axe head holes and handles for them are oblong egg-shapes. This means for a mortise you can’t just bore nice neat round holes. And worse, for the legs to set snug, you have to create a slight hip in the hole like this:

) (

When you drive in a wedge to spread the tenon, this hip gives it something to bite on, holding the leg tight.

So I had to trace the shape of the handles, bore out most of it with a drill press, then clean up the rest with a jigsaw and rasp files, and hope it would be close enough that any gaps would fill when glued.

Test mortise fit for handle tenon.

This last piece of slab was the least desirable section. It had splits in both ends that widened as the old log dried out, and deep gouges left by the chainsaw from when I just eyeballed the original cuts. I trimmed a limb stub off one end and that made the whole piece just narrow enough to run through a planer. Nothing to do about the worst chainsaw cuts, but one side came out clean.

Next challenge is the cracks. These are big splits, with daylight showing all the way through the slab, running much of the length. Bowtie keys (dovetail keys, dutchman keys) would stabilize the cracks and can be sort of decorative on a fanciful art piece.

Paper templates over cracks.

I had a plate of solid copper in the shop. It was the embossing plate from the cover of a literary collection we edited years ago, with the engraving of the original design. It was thick enough to cut into keys and be inset across the cracks. The butterfly shape has the same practical effect as hip-shaped mortises – they lock parts in place so they can’t separate.

Parts cut and shaped, holes drilled, inlays inset, the last step is to glue everything together and hammer the wedges home. There is only one shot at doing the legs. Once you drive in the wedges, there’s no getting them back out. All you can do is apply the glue before you start and hope for the best. I opted to use epoxy to give me a little more work time, and is better at filling gaps. Epoxy would be used for filling the splits anyway, so using it everywhere prevents weird shifts in the final finish.

I did the keys first so I could hammer those in tight. Then took a deep breath and did the legs. They worked out well, with only one or two places that needed filling with a paste of sawdust and epoxy.

Bowtie cleats glued, legs glued with wedges driven into handle tenons

A week later, I added a backsplash lip of poplar just to keep things from rolling off the back. This was screwed and pegged. Then I could clean up the residue from glue-up and apply the finish coats.

To fill the cracks, tape is applied to the top side, sealed tight, and while the table is inverted the cracks filled with epoxy, which flows down and flat against the tape. Bottoms and legs are just brushed on. A few days later, the assembly can be flipped over and the tape removed.

For the top, I used a trick I learned building the boats. You first spread a thin coat of epoxy with a squeegee, then roll out a sheet of mylar film and squeegee out the air bubbles.

A day later, the mylar lifts off clean. This makes a thin, smooth layer of epoxy, perfectly flat. In fact, too flat and glossy for this rough project. So the last step is to buff the surface with 0000 steel wool for a more matte finish.

Overall it came out well. Looks like a greyhound on spindly legs. Weird enough to be fun.