Brazing brass with silver solder. Red hot, the melting point of silver alloy.
Had a very interesting weekend. Once again, a few screw-ups, but ultimately it turned out well, and a lot of very useful stuff was learned in the process. If you want a Quick Tips list, skip to the bottom of this post where there’s also a video.
Original plans were to make the Rudder parts using a method like that used before on the turning blocks, a combination of creative bending and mechanical fasteners. After bending the initial angles, though, it was apparent that wouldn’t be easy with the far heavier brass stock for these parts. I expected a struggle, but it might have worked.
I considered soldering, but didn’t have any faith in the strength of it, and discarded that idea almost immediately. I’ve done a bit of plumbing work, and have had the experience of pieces coming apart in my hands – not a good thing with plumbing, but potentially disastrous for critical components of a boat, such as, say, the steering. So for known reliability I settled on fasteners.
About a month ago, though, I happened across an article in WoodenBoat Magazine #215. I keep that issue laying about because it features an article on friend and fellow boat builder Timmo Schleiff. Flipping through it during a break, a few pages after the article on Timm, was a better solution. The author, Harry Bryan, describes joining a bronze rode, end to end, with silver solder, and shows a photo of then bending the rod in a U with a vise to show how strong the joint is. This was not like any soldering I had ever done, but the concept was the same, and could be accomplished with the same inexpensive tools from the hardware store. It definitely deserved further exploration.
The brazing “weld” is typically stronger than the metals it joins.
Turns out Silver Brazing – sometimes incorrectly called silver soldering, or hard soldering – is incredibly strong and widely used to bond even dissimilar and non-ferrous metals that are usually difficult to weld. In fact, it’s used to attach hard carbide tips onto saw blades and drill bits, and can even repair a broken bandsaw blade. Apparently, you can even bond high tech ceramics and metal together. The brazing “weld” is typically stronger than the metals it joins. The only difference between this super soldering, and the stuff used for copper pipes, is the type of solder and gas used.
Copper pipe soldering, or “sweating,” normally uses a tin alloy solder and a propane torch. The tin melts at a relatively low temperature easily reached with propane or even soldering iron. For brass or bronze brazing, you use a silver alloy solder and a MAPP gas torch. The silver solder is a bit expensive, and has to be special ordered or purchased from a welding supply company, but you use very little at a time. The type recommended by Harry Bryan is 45% silver and very high strength, which is what I got for this job. The high silver content means it melts at a much higher temperature, though, making it more difficult to work with on large pieces with just a hand torch. When the connection points are small, or under a heavy load, you may need this high silver content solder. However, it’s pretty easy to find it in the 15% silver range, as this is the type commonly used in HVAC and refrigeration work for compressors. For average loads, or parts attached with relatively large surface joints, I think this would be fine, and since it melts a little more quickly is easier to work with.
MAPP gas is just like propane but burns hotter. It comes in a yellow bottle instead of blue, and is sold next to the propane in the plumbing department (like I said, the traditional boaters chandlery) and uses the same nozzles, etc.. I had a partial bottle already, but a fresh one was only $9. Add a good quality flux, also cheap, and some solid brass stock, and you’re all set.
 45% Silver solder, found on ebay
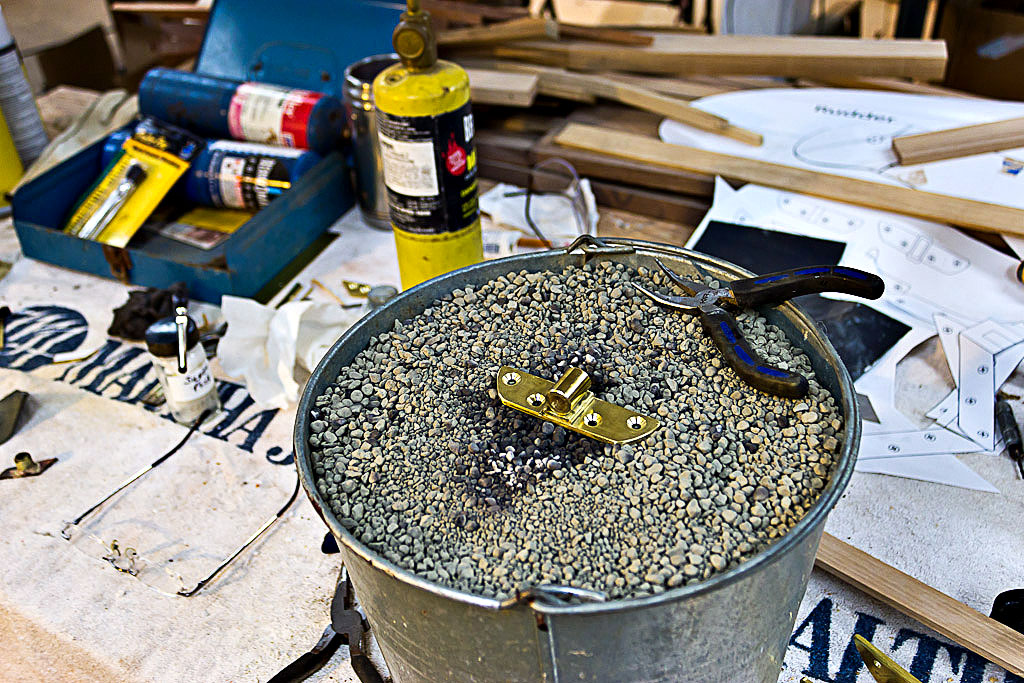
From the annealing process earlier, I knew it would take a long time to get the parts hot enough to melt the silver. It took a long time to bring just the brackets alone to a dull red. With large or thick pieces, the metal radiates heat so quickly you can’t keep up using a small hand torch. One solution is to insulate the parts that don’t need heat. You can bury those sections in clean dry sand or unscented kitty litter, which has the advantage of holding the parts steady in a fireproof container. Jewelers use pumice or charcoal, apparently, and there are probably other things that would also work. I used kitty litter. If possible, preheat the material at least once to burn off any impurities before you start. I didn’t, and ended up with a coating of black soot deposits on the first pieces that took a lot of work to clean off, but each piece came out progressively cleaner thereafter. Otherwise, the kitty litter worked great. It took less time to get the whole assembly red hot than just the corners of the brackets alone when left exposed.
The brass parts need to be clean where they’ll be joined. Fine 1500 grit sandpaper removes any oxidation or fingerprints quickly down to bare shiny metal. Don’t go overboard on polishing the rest of the parts, yet. You’ll likely have a lot of filing, sanding and cleaning to do after brazing, so there’s no benefit in having everything perfect beforehand. I found that out the hard way, too.
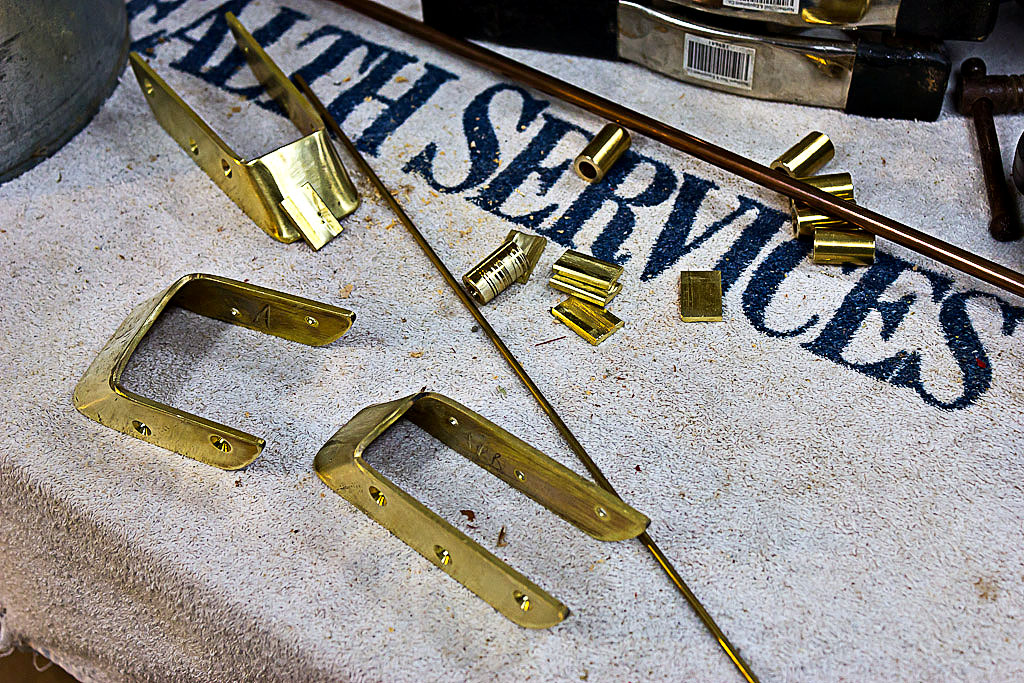 Parts shiny and ready for brazing. Too shiny – much of this work was wasted.
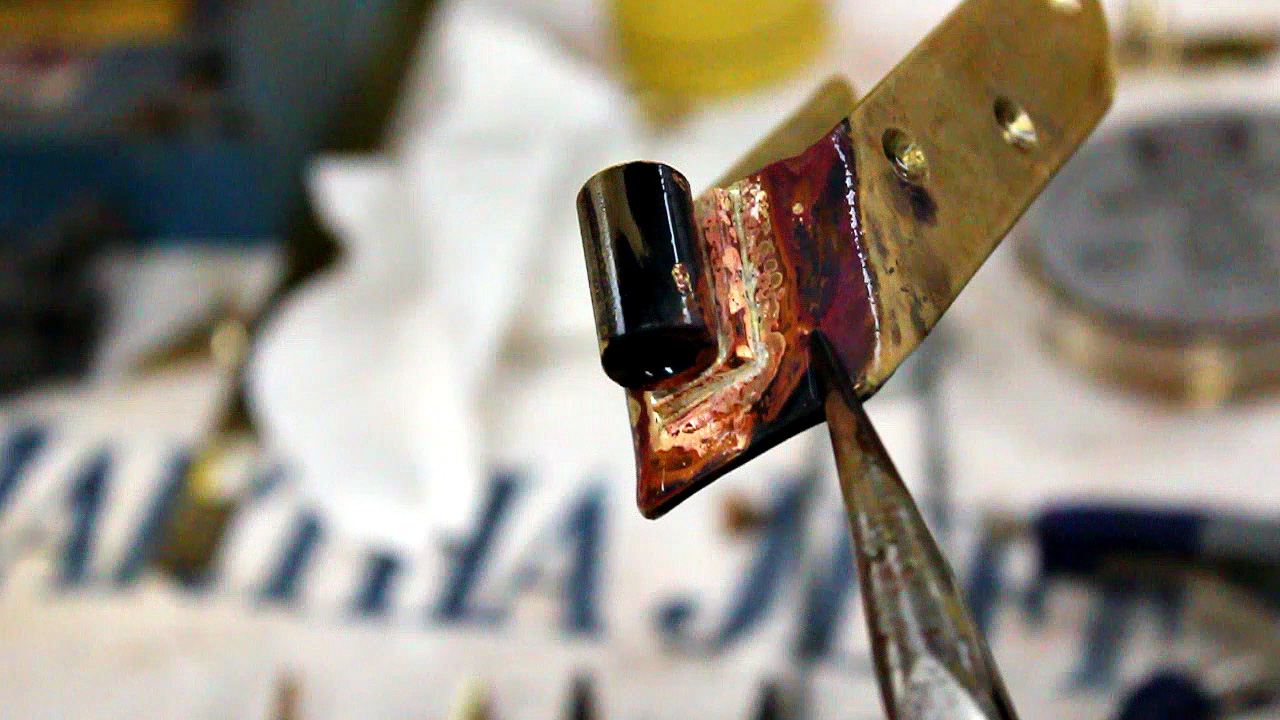
When everything is ready to go, apply the flux paste to the brass. Some people recommend a lot of flux, but I say use only a thin layer applied to just the mating surfaces of each piece. Here’s why: Wherever the flux goes, the solder will go, too, so only put flux where you want solder. If you put it on too thick it will just run out all over your piece as it melts, moving your parts as it goes. Also, when the flux gets super-heated it becomes a dirty glasslike substance that’s difficult to clean off. Quenching the pieces quickly in cool water helps, as it flakes off much of the excess flux, but the metal will still be stained. Both excess flux and excess solder are a real pain to remove if you want a neat finish, so a little bit of care at this point will save a lot of work later.
Initially, I thought I would just file a small facet on the piece of pipe to make a flat mounting surface for the joint. But I realized in this case doing so would make the two parts of the Rudder “hinge” rub together. The solution was to file a trough in a small backing piece to make a seat for the pipe between it and the bracket. I see now I could have just used the flat piece as a spacer and filed the facet on the pipe after all, and that would have worked, too. The trough cradled the pipe, though, and that was helpful later, as you’ll see.
Simply touching them with the solder wire when the time came made the parts move out of place.
Another thing I learned quickly on the first test piece (testing is highly recommended for us first timers) was that with small parts, simply touching them with the solder wire when the time came made the parts move out of place. To solve this problem, I snipped off small pieces of solder wire and laid them against the parts at the seams. Solder will flow toward heat. So, by applying flame to the opposite side, when the assembly reaches the melting point of the solder, it flows into the seams all the way to the opposite side. Perfect. I highly recommend this method. It also has the added benefit of making it easy to precisely control the amount of solder used. Too much, makes a mess, flowing out onto your piece where you’ll have a tough time filing it off. Too little, and you get a weak joint. It doesn’t take much, though. You only need enough to fill the gap between two parts that are, in fact, actually touching. This method also leaves you with a hand free. You’ll need it. If the size or location of your work doesn’t allow that, and you have to apply the solder from a long piece of wire, you can put a bend in it to help visually gauge how much you’ve used.
Here you’ll see the one of the smaller rudder parts cleaned, fluxed, and ready to go, with small bits of solder wire already in place:
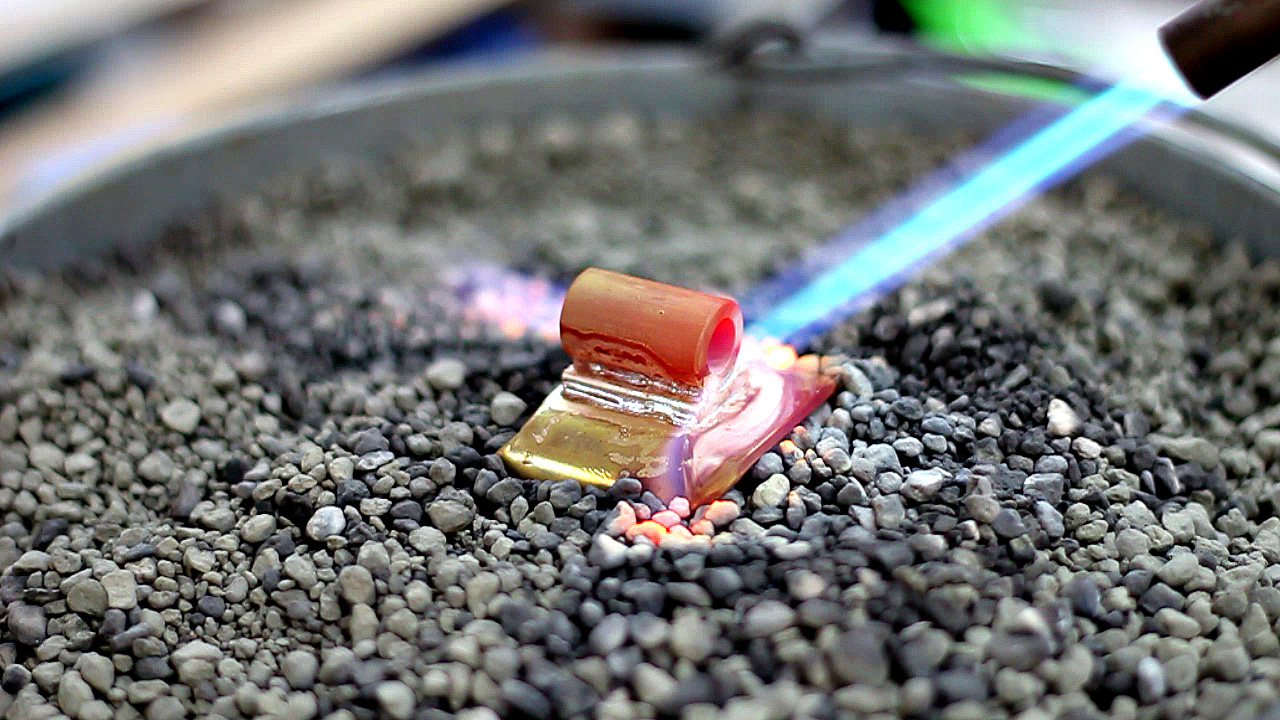
Here’s why you’ll need that extra free hand. The big surprise was the parts will actually move about on their own as you heat them. The flux is water based and boils when it first heats up. The bubbling will move small parts around. Next, as the piece gets hotter, the flux itself melts, forming a little slippery magic carpet on which your parts will try to ride to Arabia and back. I didn’t realize what was happening at first, and had to reheat and reposition two of the first pieces that moved and hardened in the wrong place. If you can figure out a way to clamp the parts in place, do. It won’t take much to hold them, but a little help will make a big difference. If you watch the video you’ll see the parts sliding all over the place, and that was shot after it got things under control. This morning I thought of a couple of things that would have worked easily, even a piece of copper wire laid across the top with the ends buried in the kitty litter would have done the trick. As it was, I had to keep poking the parts back into place until the solder melted.
Pushing the parts back in place as they slide around.
Wings of the bracket are buried in clay litter to retain heat.
Once the parts start to glow, you’re close. When they’re red hot the solder will suddenly and melt, sometimes instantly, and flow into the seams toward the heat. When you can see a thin silver line along the seams on all sides, like the cream filling on an Oreo cookie, you’re done. Turn off the torch, let the piece cool for a few moments until it no longer glows, then dip the piece in cool, clean water to quench it. The quenching isn’t necessary, but does help flake off excess flux.
Thin line of silver along the seams.
 Top piece for the Transom side.
 All the parts after brazing. On the right is the first piece, black all over from burning off impurities in the clay. The pieces came out progressively cleaner as the clay got cleaner.
As you can see, the torch scorches the metal and leaves sooty deposits. In this age of modern chemistry, there’s got to be an easier way to clean this stuff off. I tried several things but no luck. I was about to try oven cleaner until I read it would dissolve the brass. If you know of anything that would work for this, or just have and idea, leave me a comment and I’ll try it out on the next piece. Maybe battery terminal cleaner? (Update: The answer is Citric Acid. See Part 5.) Until then, I found a flat file took it off quickest, followed by 220 grit sandpaper, then 1500 grit sandpaper to remove the new scratches, then 0000 steel wool to restore the final polish. I left plenty of dings and such just to prove these were hand made, but you can see that spending a lot of time before brazing, getting everything perfect, is mostly wasted effort. Save it for the end and do it once.
Terri helped me clean them all up again on Sunday (Thanks T!) and by Sunday night everything was clean and shiny again.
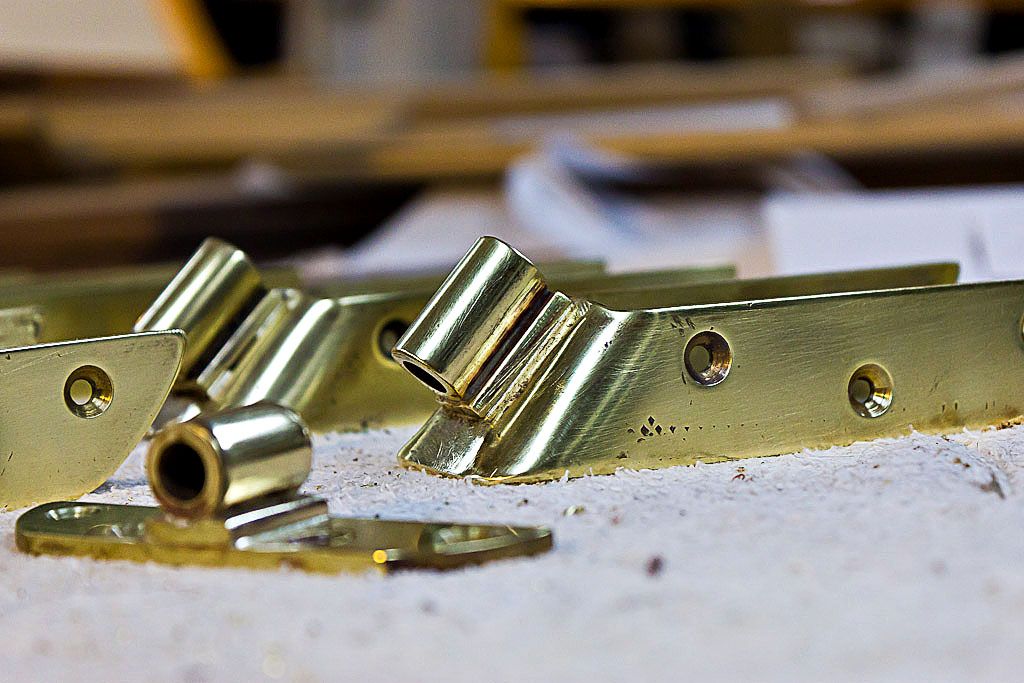
 Finished parts, marked again for the boat and location where they fit.
Just a couple of more parts left to make – some pipe cleats and a skeg skid plate/rudder bump and weed protector. This brazing thing worked well, though, and I can think of all sorts of essential and hard or impossible to find boat parts you could make this way. Goose necks, boom fittings, jam cleats – all kinds of things you just can’t buy any longer – at least in any form that looks right on an old boat. You could reasonably make them yourself this way with relatively easy to get materials. For high strength parts, with a source for scrap bronze, you could even cut and mill that to the desired shapes and join them together without forging from scratch. Make deck cleats from bent rod, for instance.
Ok, I know what you’re thinking: “This is the same guy who didn’t want to take an extra day to make a bird’s mouth mast?”
Whatever. Here’s the video. The middle 6 minutes is boring, but shows what happens as the flux and metal heat up in real time. The last 3 minutes is more entertaining as things start to go terribly wrong:
Quick Tips for Silver Brazing:
- Use MAPP gas instead of propane for all but small pieces. It burns hotter and will take less time. Propane alone may not get large pieces hot enough.
- Be sure you get solder with at least 15% silver content. Higher silver content means a stronger joint, and may be necessary for parts under strain or joined on edge or with small contact points where 45% silver may be a better choice. Higher silver content can mean a higher melting point though, depending on the other alloys present.
- Don’t bother polishing all of each piece before you join them. You’ll just have to do it again after.
- Clean the mating surfaces of all parts well. Use Citric Acid solution if possible, it will dissolve oils and other contaminants, then sand to bright metal with fine sandpaper.
- Insulate the non-work areas of larger pieces to retain heat.
- If you use fresh sand or kitty litter or some other material for a firing pit and insulator, pre-heat it first if possible, at least once, to burn off the impurities.
- Use only a thin layer of flux on the mating surface of each piece, enough to coat each piece. A thick layer will just boil away, making your parts move in the process.
- Use just the right amount of solder. Test this out on trial pieces until you get a feel for it. Typically, a 1 inch long piece of wire will be about right for a 1 inch square joint if the two pieces fit flush without gaps.
- Make or rig some sort of holder to keep the parts from moving. Use materials that melt at a higher temperature than your solder. Even so, have tools ready to reposition the work if it moves.
- Don’t panic. If something moves you can always reheat it later to remove it, then clean the surfaces and start over.
- Be prepared to spend a long time cleaning up and polishing once they’re joined. Power tools will only go so far on small pieces and those with lots of corners and crevasses. You’ll need patience and elbow grease. Update: It’s worth a trip to a health food store to get some cheap powdered Citric Acid. What it doesn’t clean off directly will be softened enough to come off with a soft brush and 0000 steel wool.
melonseed skiff, mellonseed skiff, melon seed, mellon seed, brazing, brass, bronze, silver soldering, silver brazing, making traditional boat hardware, brass rudder hardware, brass gudgeons and pintles, bronze gudgeons and pintles.







Very cool, Barry (or very hot)
Now I want to see how the pieces hold up. A note from my high school chemistry teacher: The hottest part of the flame is just beyond the blue tip. If you can’t see the tip, you’re holding the flame too close.
Sometimes, with brass alloys, it ‘s helpful to use two torches simultaneously.
How much oxygen was left in the basement when you were done?
michael
Hey Michael, how was your trip?
Thanks for the tip. I did figure that out at some point. What you can
Your patience is certainly inspiring Barry. Looks like you are bucking for the Peoples Choice award at MASCF. LLooking forward to sailing along with these beauties.
kb
Believe me, I am looking forward to it, too, Kevin. Tonight, for the first time, I actually feel like I’m now completely over this whole building thing, and I’ll be so glad when they’re done.
People’s Choice? Not if the guys from Florida show up again. But biggest award is the sailing that comes after. I imagine you’d agree, no?
– Barry
I’m about to try some silver brazing and your site is one of several I’ve looked at. You say ‘Higher silver content means higher melting point’ but all the other sites I’ve seen seem to be saying the opposite. Have I missed something obvious? Data below (sorry the formatting has gone). Anyway, thanks for doing a very helpful site.
Ag Cu Zn Sn Si Melting Range °C EN1044:1999 ISO 17672:2010 Product Availability
Silver-flo™ 60
60 26 14 695-730 AG202
Silver-flo™ 56
56 22 17 5 618-652 AG102 Ag 156
Silver-flo™ 55
55 21 22 2 630-660 AG103 Ag 155
Silver-flo™ 452
45 27 25.5 2.5 640-680 AG104 Ag 145
Silver-flo™ 40
40 30 28 2 650-710 AG105 Ag 140
Silver-flo™ 38
38 31 29 2 660-720 Ag 138
Silver-flo™ 302
30 36 32 2 665-755 AG107 Ag 130
Silver-flo™ 20
20 44 35.85 0.15 776-815 AG206
Hi Roger, I should probably clarify that point. True Silver solders are usually made up of varying amounts Silver, Copper and Zinc. Copper melts at the highest temperature, followed by Silver and then Zinc which melts at about half the temperature of Silver. The temperature at which a given solder melts will likely depend on how much of each of those elements is present. When Copper takes the place of the Silver in lower silver content versions, the melting point will actually be higher, since Copper melts at 100 degrees Celsius hotter than Silver. If Zinc replaces the Silver it will be lower. The chart from your manufacturer is undoubtedly correct for their products. You’ll notice in the chart you posted, there is not a straight line correlation between melting point and the Silver content. The varying percentages of other metals, which in some cases may include Tin, no doubt are the reason.
The main point I wanted to make is there are some cheaper “silver containing” solders that contain Silver in the 3%-4% range, and despite having Silver in the name are actually classified as “soft solders” which melt at a much lower temperature, and are not strong enough to use for these purposes. Generally, anything in the 25% to 45% Silver content range would be fine. Some 15% Silver solder is more readily obtainable as it’s used for high pressure HVAC systems and compressors, and that would likely be OK, too. And if it contains more Copper than Zinc to make up the difference, it will actually take more heat to melt it.
I’ve updated my notes in the post for clarity.
Awesome info Barry, I’ve just finished building a outrigger and am about to start all of the hardware, your article is just what I was looking for.
you mentioned making deck cleats in the last paragraph, is that for holding ropes? Is so would love to know more. have you done any more parts since you wrote this? Jeremy
Hey Jeremy, this was pretty fun. Playing with fire, what’s not to like? I did make a few more pieces this way. The shoes for the skegs, which were heated and hammered to get the shape needed, and some pipe cleats to hold the centerboard lines – tighten in one direction, and release in the other. Sort of like jam cleats, but the line feeds through the pipe making a cleat/fairlead combo. I ended up finding nice bronze deck cleats the right size, so making those will have to wait for another project.
Quenching in boiling water (not just very hot, actually boiling) will explode the flux off the metal astonishingly effectively. Much better than using water below boiling point.
Also there’s an “anti-flux” jewelers use to paint any area where you want the metal not to attach when it starts to flow.
A good couple of tips. I’ll have to try them. The citric acid bath worked well, but anything that helps with cleanup would be welcome.
To prevent parts from moving, wrap with thin, black iron wire. A bath of sodium hydrogen sulphate is effective for cleaning the parts. This is the active ingredient in several toilet bowl cleaners.
Small parts may be held in position with thin, black iron wire. A solution of sodium hydrogen sulfate is good for cleanup; this is the active ingredient in many toilet bowl cleaners.
Thank you for this helpful writeup. I will try surely your suggested method of placing solder wire length cose to the seams.