 Final Centerboard Testing, half down
We got our first snow of the season today. Big, fat, soggy white croutons fell all day long, vanishing as they touched the ground. It marks the end of fall here, and one year of working on these boats. Something about the calls of geese heading south creates a feeling of urgency, and makes me want to get a move on. I’m really looking forward to getting these on the water. Thankfully, the Centerboards are essentially done.
I planked up the cases with Cypress strips epoxied over 1/4” plywood for strength. These will be glassed inside and out, and trimmed in Ash and Walnut. Dale Andrews did something similar, running his strips diagonally. These would have worked a bit better if I had run all the plywood grain at right angles to the strips, because the ones that weren’t developed a slight a bow that took a couple of weeks under stacks of books to straighten out. But it’s all good now.
In the old days, the Centerboards themselves were made of all sorts of things, with builders using whatever suitable material was at hand. The boards have to be very strong, and heavy enough to sink under their own weight. Thick, heavy planks of solid white oak were commonly used, with iron rods driven through edge to edge, or wrought iron straps through bolted along the sides. A favorite was slabs of boiler plate steel. If your client had a lot of money, the best material was thick brass or bronze, as the problem with anything else was rot and rust that eventually led to swelling and jamming and finally failure, usually at the most inopportune moment.
Today, the most common material used on wooden boats is some decay resistant wood, filled with a pig of lead to make it sink, and the whole thing sealed in fiberglass and epoxy. This works well, and I did something similar on my first boat. The wood can be easily shaped with hand tools, and epoxy keeps the whole thing from rotting and swelling.
Working with lead can be tricky, though. I avoided the issue on my first boat by using a conventional cord to raise it, but used a shock cord cleated down to hold it at the desired depth. I’d never seen one done that way, but figured I’d try it, and if it didn’t work out I could always drill the board and fill it with lead plugs. But it has worked very well, indeed, and the elastic cord allows the board to pop up when run up on the beach or over an obstruction.
The biggest down side to a board of this type, really, is that you have to be vigilant with maintenance. Normal abrasion against the bottom, stones and oysters striking the board, etc., will eventually compromise the epoxy seal, allowing water in. Water will cause the board to swell inside the case, and I’ve seen some swell so much they not only jammed tight, but actually burst the case itself. And, of course, they rot.
With that in mind, I decided this time to return to the spirit of the 1880’s, if not the letter. The boards for these boats have been cut from a 3/4” slab UHMW Polyethylene, which is a kind of miracle plastic. Wikipedia has an interesting entry on it here. Without getting deep into the chemistry of it (which is actually very cool) let’s just say, in laymen’s terms, the molecules of plastic are so happy with each other they don’t like to stick to anything else; and, since nothing will stick, that makes it very slippery. In fact, it’s more slippery than Teflon. And their happy hand holding makes them reluctant to let go, making it very, very tough and resistant to abrasion. So tough, it’s often used for commercial cutting boards and wear surfaces. Roger Crawford uses this stuff for his centerboards, and I have to say he’s really hit on something. They don’t absorb water, so they can’t swell, they can’t rot, and they’re almost immune to impact and abrasion damage. May not be the most traditional of materials, but since this is the one part of the boat you never see, I’m willing to compromise. And doing so solves a lot of other little problems.
McMaster-Carr carries UHMW in sheets and bars, along with some brass I needed, so I ordered it from there. I got some in 1/2” thickness, but it seemed a little too bendy, so I’ll find uses for it elsewhere. It also comes in 5/8” sheets but I went ahead and got some 3/4” to be safe. I’m only leaving a gap large enough to slip a butter knife between the sides of the case and the board, relying on the slipperiness of the boards to allow them to slide freely. If the cases swell for some reason, the extra thickness can be shaved from the boards to make a bigger gap.
Another nice aspect of the plastic is it’s nearly the same density as water, meaning it willalmost sink, so no need for messing with lead. I took a sheet to a local pond to test it out.
 UHMW Polyethylene, barely floating.
 A 2’x4’ sheet mostly sinks, only a few inches remain above the surface.
Roger Crawford doesn’t add any weight to his boards, and just let’s them sink on their own. That does work, but the boards are just buoyant enough that they’re slow to sink, and when partially down there’s almost no resistance on the pennant, making it hard to tell if the board is down or not. Sometimes you need to bear away from a shallow dock quickly going upwind, and you want the board to drop fast. Part of the challenge has been coming up with a way to incorporate the aspects I like from my first centerboard into these.
The final design ended up as a cross between a conventional Centerboard and The Magic Crescent, and I’m really hoping the marriage doesn’t breed monsters. I won’t know for sure how well it works until they hit the water in the Spring, but early indications are good.
The biggest benefit is when this board is full down it replicates almost exactly the size and location of the original daggerboard. And it does it without the case protruding into and obstructing the cockpit. The top of the case will be flush with the coaming, and the rear of the case angles down at what should be a good position for a backrest. I have found this is the most comfortable spot in the boat for a passenger, leaning back, facing the person at the tiller.
I moved the pennant for raising the board from the back to the front. It’s easier to install in the back, but then when the board is all way down the cord is strung taught between the board and the bottom of the boat, and it acts like a strainer, picking up grass and seaweed and such, sometimes getting so thick with stuff you can’t raise the board, or worse, you run the boat up on the beach and it packs the board and the grass into the case so tight it won’t come back down. Doesn’t happen often, but when it does it’s a pain.
With that in mind, I also took a tip from my first boat and added a cord to pull the board down. This will solve the problem of the board being slow to sink, and will provide a way to easily dislodge minor jams without requiring beaching and turning the boat over, or surgery, or a push stick. I’m thinking I’d like these cords to stay out of the way, and feed around the cockpit to the back by the tiller, so they can be operated easily from there. To this end, and for smooth operation of both cords, I needed to make a couple of custom blocks to operate the lines.
I got some brass and nickel blocks from the hardware store for a couple of bucks each, knocked the pins out, and used the solid brass sheaves with some sheet brass and screws, using pieces of that slippery UHMW plastic for fairleads.
 Cheap blocks, cannibalized for their sheaves.
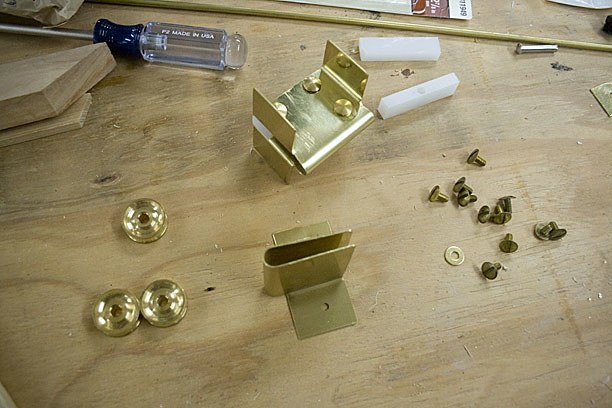 Making custom brass blocks with sheet brass and screws.
These fit within the the profile of the case so they won’t snag on gear and lines, but can be removed easily for restringing and maintenance. For big jams there’s an access hole at the front, and the boards will be held captive by the pin in the event a cord breaks. But the boards, too, can still be easily removed for restringing and maintenance.
 Front cord and block for raising the board.String
will be replaced with smooth parachute cord.
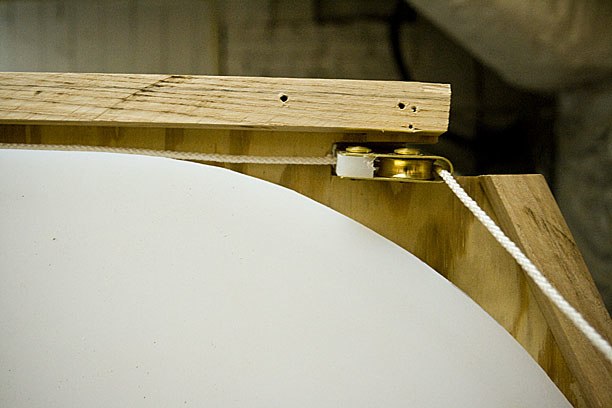 Rear cord and block to pull the board down to depth and free light jams.
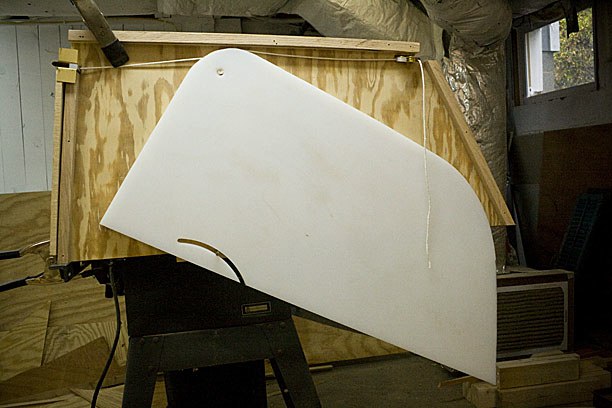
 Ready for testing, viewing inside the case.
The action of the boards is nice and smooth. The arc of The Magic Crescent reappears in the sliding slot for the hinge pin, cut with the router jig, which also acts as a pivot like a conventional board. The rear curve of the board also works similar to the curve of The Crescent. In a sense, it’s just a much bigger circle with the top lopped off flat at the deck. Getting the angle of the case, the curve of the board, and the alignment of the pin correct so that the boards would still kick up was, admittedly, pretty tricky, but it seems to work fine. Things do change once in the water, though, where gravity acts differently, but I think everything will be OK. The slipperiness of the plastic helps tremendously in preventing things from binding.
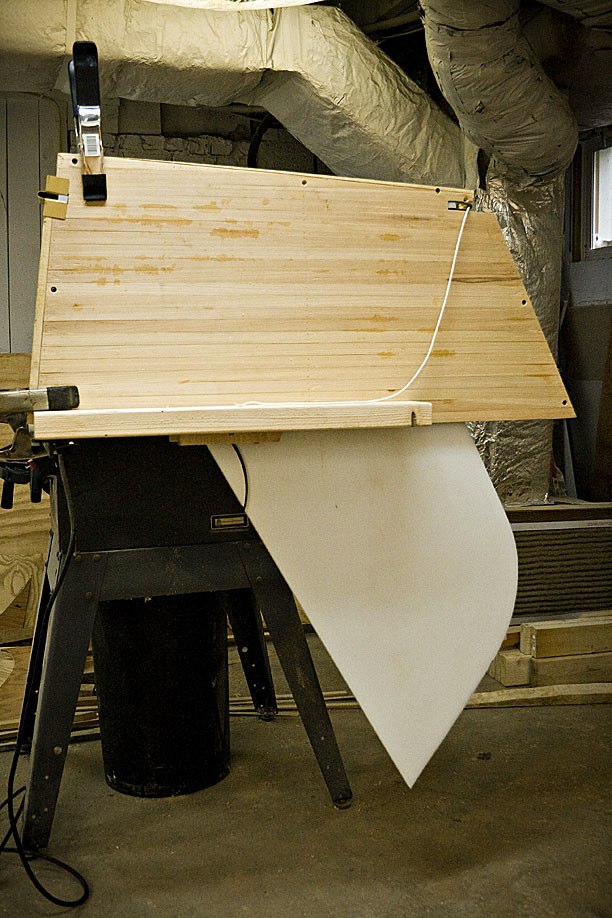 Fully lowered, with the case closed up.
Worst case scenario is something doesn’t work out, or becomes more trouble than it’s worth, and I’ll end up extending the cases into the cockpits after all, making longer boards and hinging them at the front the way sane people do. But for now, at least, I’m very pleased with the results. Everything will get a good cleaning and sanding before they’re epoxied and screwed in place.
Finally, I can get on with the framing.
melonseed skiff, mellonseed skiff, melon seed, mellon seed




Brilliant! and bold!
Sunday, December 6, 2009 – 10:53 PM
simply and clever, my best compliments! Only a question: if unfortunately it touches the bottom of the sea the centerboard re-enters in the case?
Ciao, Giuseppe
Monday, December 7, 2009 – 04:01 AM
Giuseppe, it does still “kick up” when it hits the bottom. It takes more pressure to lift than a board simply hinged at the front- the rear curve of the board against the back of the case pushes it up and forward – but it still moves smoothly. I’m think in the water, when the board weighs less, it will kick up even more easily. But I won’t know for certain until I can try it.
Tuesday, December 8, 2009 – 09:32 AM
I am building a Melonseed with the shop class at Logos High School in Moscow, Idaho. I like the look of your design and its advantages. I was wondering if you are still happy with the design and/or what problems you have had with it. Would mind me borrowing your idea?
Hi Jody. A Melonseed in northern Idaho? Some challenging sailing grounds, for sure. So far I’ve been very happy with the centerboard design. I especially like the open, comfortable cockpit it allows. Very nice to lean back against the case as a back rest. And the boats sail well, so the boards work as advertised. The only issue I’ve had at all it common to any centerboard treated badly – once or twice I’ve run the boats up onto gritty beaches and jammed the boards with sand and grit packed into the cases.