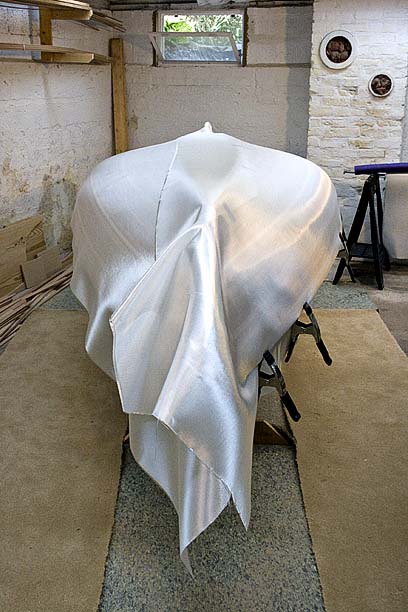
Draping 6oz Fiberglass Cloth
A Metamorphisis
The process of glassing a hull is like riding a roller coaster – there’s a long, slow buildup, but once you start there’s no turning back, no matter what, until it’s all over. If you make a mistake, too bad, cuz anything you can’t fix quickly you pretty much can’t fix. You just have to suck it up and keep going.
I saved a three day weekend for this marathon session. Spent Friday making nervous preparations, worked non-stop for 16 hours on Saturday, slept for 4 hours, and went another 8 hours on Sunday. Between the fumes, lack of sleep and fatigue, by the end I had lost all fine motor skills and the ability to finish sentences. Still, things came out very well. A few imperfections here and there, but nothing that can’t be dressed up later.
Caterpillars
It takes three layers of epoxy to complete a layup. The first wets out and saturates the fabric and wood, the second fills the weave, and the third flow coat levels everything out with a layer of epoxy thick enough to do a final light finish sanding before paint or varnish. Each coat of epoxy needs to chemically bond with the previous layer, and there’s only a finite window as the epoxy sets up, between tacky and cured, when this can happen. If you miss that window you have to rough sand the previous coat to get a mechanical bond, which is not nearly as strong.
Hardeners come in several speeds for epoxy, but I always use the slow hardeners for everything, as that leaves me the time to semi-correct the screw-ups. I don’t see how people do it with the fast stuff. You could use fast hardeners for bonding and fillets, and that would be convenient, but then you’d have to buy extra hardeners, which are very expensive, and a little heat or patience accomplishes the same thing.
You start out by taping off edges and protecting areas that will stay epoxy free. I need a good glue joint later between the transom layers and the stems so I sealed those off well. Remember to take the tape off before the epoxy sets up or you’ll have to sand it off later.
Chrysalises
Next comes cutting and draping the fiberglass. I bought a whole roll of 36” wide 6oz cloth – enough to easily do both boats, and it’s way cheaper by the roll. Sheets 60” wide would cover each hull in one piece without a seam, but I want to put a double layer over the keels anyway, so went with the cheaper width, and will pay the difference in labor to sand out the overlap.
Vacuum off the wood carefully, wait for the dust to settle, then wipe down with denatured alcohol and let dry. Don’t kink or fold the fabric, or it won’t lay flat. Whatever you do, do not let the cloth touch anything between the roll and the boat, and definitely do not let the cloth drag on the dirty floor while you try to figure out how to handle 16 feet of fabric by yourself without folding or kinking it. Let me say that again: Do not drag it on the floor. Otherwise you’ll be as amazed as I was at how much dust and fuzz and boogers and miscellaneous crud will become permanently a part of your boat. After the first sheet I used a foam Funoodle to spool the fabric onto before cutting, and that made a handy way to move it around and roll it out clean.
Terri saw this picture and said they look like brides in satin wedding gowns, which was kind of funny. Then she wondered aloud if they were my new wives, which kind of wasn’t. Funny girl.
After smoothing everything out for a nice wrinkle-free fit you have to tape back the top layer so it doesn’t, you know, fall on the floor when you turn your back on it and gather up more crud. No, it will not stay put by itself. Trust me on this.
Put on a Tyvek bunny suit, take a deep breath, and go at it. And don’t stop. Except to take a picture.
Butterflies
After the first coat cures to about the consistency of dried leather you can trim off the excess cloth with a razor. You can also use those sharp cabinet scrapers again to shave off boogers, bugs, drips and runs. I also mostly shaved down the overlap seams. After the final flow coat I had to shut all the windows – the massive oak tree by the driveway was pumping clouds of pollen into the basement with the help of the ventilation fan.
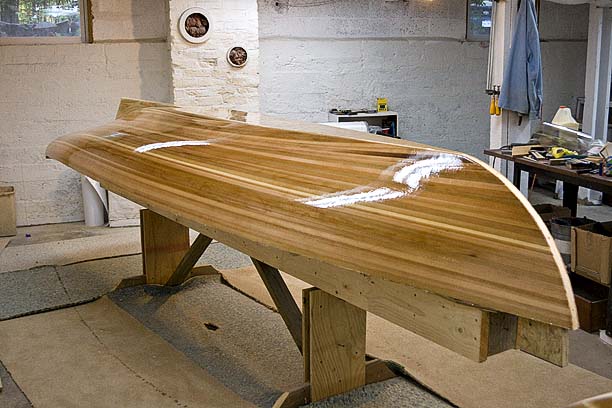
There are a couple of bugs that are now one with the boats, like ants fossilized in amber, and there are some drips to sand out later; but all in all things came off pretty well. And the transformation is stunning. Wood really is pretty:
Apparently, I sanded off all the filler I used in the staple holes. I know because the sample piece I used that didn’t get sanded has no visible holes. Whatever. The idea all along has been to paint the outsides of the hulls for easy maintenance, but I wanted to leave open the option to finish them bright if I change my mind later. Otherwise, I would have left off a whole lot of sanding.
These definitely turned out nice enough to leave bright:
The skegs have epoxy base glue, plus fillets, plus double layers of fiberglass bonding them to the keels and hulls. I don’t think I’ll need screws after all – anything strong enough to rip them off now would just take screws along too.
Hard to believe it, but next is flipping them over to strip up the decks and start on the insides.
melonseed skiff, mellonseed skiff, melon seed, mellon seed


Sometimes you get the Muse. Sometimes the Muse gets you. Here we’ll call it a tie.
Tuesday, April 28, 2009 – 05:26 PM
Barry, the boats just get more gorgeous! Truly mouth-watering.
I feel like such a sloth sitting here watching you build two boats!
Friday, May 1, 2009 – 06:50 PM
Don’t fret, Roger. I’m just trying to get where YOU are already. Your sailing stories are one of those things that keep me going. When I get tired I just think of Nancy Lee perched in a bed of lily pads.
I keep your Small Craft Advisor article on the bench next to Chapelle and Barto’s plans, by the way, so I can flip through it on breaks.
Thanks!
Barry
Friday, May 1, 2009 – 08:30 PM
Barry, why did you not fiberglass the outer stems to the boats? I am at this stage on my own boat and had overlooked that detail before. Thanks.
-Jayson
Jayson, it taped that surface off only to ensure I would have a good clean wood surface for glueing when it comes time to attach the stems. Bare wood to bare wood bonds are stronger (with epoxy or wood glue) than if one surface is hard cured epoxy. You can rough up an already epoxied surface and still get a good bond, but the stem takes such a beating – from the nose to the keel – that I wanted to err on the side of caution.
Barry I’m sure glad I took a break from building and looked at your stuff again, I hadn’t yet tumbled into cutting a “shoe” in the skeg into which the toe of the rudder would go and therefor be mostly shielded from grass, debris, etc. Funny, I’m stealing ideas from Barry Long and Dave Lucas – safe to say are on different ends of the building spectrum!
Buddy, Dave and I enjoy each other’s company for sure. We’re in the same boat, it’s just a very big boat. I sure wish I could build things as fast as he does, and there’s nothing he’s too chicken to try.
Is this the shoe you’re talking about?
https://eyeinhand.com/2011/08/05/brass-rudder-shoes/
https://www.facebook.com/photo.php?fbid=2922252377821710&set=pb.100001109304396.-2207520000..&type=3&theater
The cutout on the skeg which will shield the toe of the rudder….. Not in the original plans.
I’m at 320 hours by now….. best I can tell.
Ah yes, that notch was step one of protecting the rudder toe. Step 2 was the brass rudder shoe, but rubber or plastic would work, too.