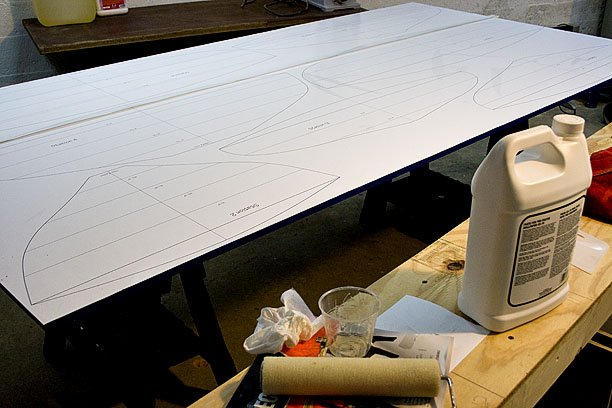
The particle board I brought home either got wet in shipping or the glue and moisture from manufacturing hadn’t dried. Either way it was damp, and as it began to dry in a stack it started to curl and warp. Not good. Had to prop them up flat with spacers and blow air through so the sheets would dry at the same rate on both sides. That’s my roll of patterns on top.
Patterns for molds have to be transferred to sheets of particle board and cut out. This transfer of measurements to a full size pattern, when it’s done old school, is called lofting. The traditional way is done with a thin flexible wood batten, bent against nails driven in at precise points, and lines traced along the edge of the batten. A clear piece of wood produces a “fair” or true natural curve. It was called “lofting” because it was usually done in the loft of a barn or building, which was often the only wide open floor space available. Same for a sail loft, which is where sails are made.
Barto supplies a set of full size half patterns with his plans, so you can just trace those to tracing paper, or cut them out to trace on the wood if you prefer. The problem for me is Barto’s plans, which specify Okoume mahogany ply for the decks, don’t include the camber or crown of the deck – it’s just cut off flat on the molds – so I’d have to eyeball that complex curve while building the frames. The ply will hold a decent curve even if you’re off a little bit. In a strip built deck though, like I have planned, any bump will project through the strips, and there will only be half as many frames. So I don’t trust my eyeball to get it right. Seemed like if you strip the decks, just like the hulls, it would be helpful to have those curves already built in to the molds. So I went New School. That original idea of entering the measurements into a spreadsheet, and then a drafting program, turned out to be very handy.
I had already entered the offsets in my drafting software, and had done all the lofting in Adobe Illustrator to check fairness of all the lines. Once that was done and scaled to actual size, it was easy to lay out the mold patterns on 4×8 sheets. Then I printed out the sheets on a waste roll of paper at work on the plotter. This saved all the manual labor and tedium of drawing the patterns out on the particle board by hand with a tape measure, a straight edge and bent batten. Not very old school, certainly, but I’ve done that before, and this saved years of use in my knees and back. The sheets are almost the full width of the particle board, but not quite. There’s a second strip for each sheet that overlaps.
Used a bottle of wallpaper paste to glue the sheets down. The paper is waterproof, which is good in that the paper doesn’t get soggy and tear or stretch. But that also means the glue doesn’t hold it very well. It only needs to stick long enough to cut out the molds, so maybe it will hold that long. May have to supplement with tape or clamps while cutting.
All sheets and patterns glued, waiting to dry.
You can see the cedar wood strips in the rack against the back wall. I ordered 16 foot strips of Western Red cedar from Noah’s in Vermont. They’re based in Canada. Nice people. Instead, they shipped all 20 foot strips for the same price, I guess because that’s what they had on hand. I may have enough left over to do a canoe, which is great, but dang those things are long, longer than the space I had available to store them. Had to build the ceiling hung rack just to make room to walk around. They came in two big cardboard tubes, on the floor below, which may make good temporary steam boxes.
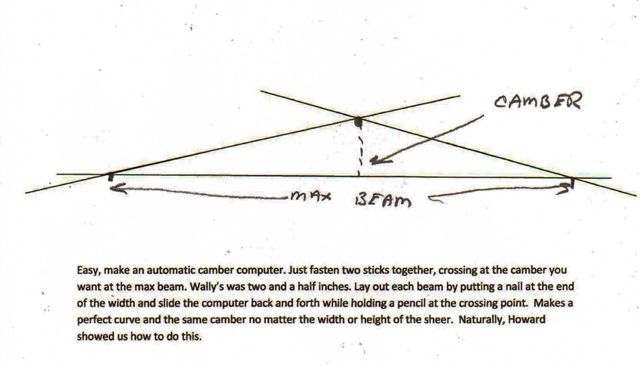
Camber Computer via Dave Lucas & Howard Heimbrock – (added 1/21/2012)
Here’s a nifty tool for drawing curves the old fashioned way, useful if you need to loft the camber for your deck beams or on the molds and don’t have a CAD system and a plotter. This came to me from Dave Lucas and his Expert in Residence, Howard Heimbrock. You make it by firmly tacking or glueing together two battens crossed at the highest point of camber above the widest mold or deck beam. Each batten leg needs to be as wide as the deck from the crossing point to the end. Put a nail at the sheerline on each side of the pattern. Hold a pencil at the crossing point and slide the “computer” all the way from one nail to the other, scribing the line with the pencil as you go.
melonseed skiff, mellonseed skiff, melon seed, mellon seed


Your website is a trove of information. It has been a delight to visit. Thank you.
I’ve recently received the Chapelle plans from the Smithsonian and so will begin lofting in the coming weeks. In one of your later posts, you mention that you incorporated crown and camber into your molds. How did you determine what those would be for each mold, please?
Hi Glenn, thanks, and congrats on obtaining your plans. You have so much fun ahead to look forward to.
I used the basic formula Chapelle gives on the plans for determining the crown or camber – 3.5″ of height for 4 feet 2.75″ of width. That translates to 3.5″ high on the centerline at Station #7.
I drew the camber into my mold patterns when I plotted them out in Adobe Illustrator, using several other programs to cross check and tweak the curves to my liking. But it doesn’t have to be that complicated. Since the value in the plans corresponds to Station #7, you can just do that station pattern first. When you cut that one out you can use it as a template for drawing the others.
1. Loft out all your molds first, drawing a flat line across the top of each from side to side at the sheer. Scribe the vertical centerline so it extends above that line by at least 3.5″ on the widest molds, a bit less is ok on the others.
2. On the pattern for #7, mark a point on the vertical centerline 3.5″ above the horizontal line that runs from sheet to sheer.
3. Use a batten to scribe a curve from sheer to sheer that passes through that mark, taking care to make sure it’s symmetrical. Or, you can use a “camber computer” to scribe the curve. Dave Lucas recently sent me a picture describing how it works, and I’ve posted it above.
4. One you have Station #7 cut out, you can line it up on the centerline of the other molds, slide it down until the curve intersects their sheer on each side, and trace the curve on those patterns.
Thanks for the great reply. Your solution would have taken me a lot of trial and error, time and worry to get to, and I never would have figured out the camber computer.